Step 1: Access the Creation Menu

For Workspace Owners and Editors
For Workspace Owners and Editors
- Click Create on the top left in the sidebar
- Select Create an Assistant
- This allows you to create an Assistant at the Workspace level or within any Group
For Group Owners
For Group Owners
- Hover over your Group name
- Click the ellipsis that appears
- Select Create an Assistant
- Group owners can only create Assistants within their own Groups
- If you need to create a new Group and don’t have sidebar access, contact your workspace administrator
Step 2: Configure Basic Settings
- Enter a descriptive name that reflects the Assistant’s purpose
- Choose where to make your Assistant available:
- Shared with everyone - Available to all Workspace users
- Note: Only Workspace Owners and Editors can create “Shared with everyone” Assistants
- Group - Add to an existing Group that’s already “Shared” or in your “Private” space
- Learn more about Group types
- Shared with everyone - Available to all Workspace users
- Click Create Assistant to proceed to customization
Understanding Assistant Visibility: Assistants placed within a Group are visible to all members of that Group. For LMS-linked courses, students will see any Assistants in the linked Group when they access Nectir AI. You can control visibility at any time by moving Assistants in or out of Groups - removing an Assistant from a Group will hide it from users, and you can add it back later to make it visible again.
Step 3: Customize General Settings
| Setting | Description | Best Practices |
|---|---|---|
| Avatar | Upload an image for your Assistant | Choose something relevant to the Assistant’s purpose |
| Name | Your Assistant’s display name | Can be role-based (for example, “Feedback Provider”) or persona-based for a more approachable feel |
| Assistant ID | Used for LTI integration | No customization needed |
| Group | Where the Assistant is accessible | Use dropdown to move between Groups or your Private space |
| Description | User-facing description that appears in chat | Essential for setting user expectations and providing clear guidance |
Best practices for writing effective descriptions:
- Introduce the Assistant’s purpose: Clearly explain what the Assistant is designed to help with
- Provide usage instructions: Give specific examples of questions users can ask
- Set expectations: Explain what the Assistant can and cannot do
- Include guidelines: Share any rules or boundaries for appropriate use
- Use clear, conversational language: Write as if speaking directly to your students
Managing Assistants
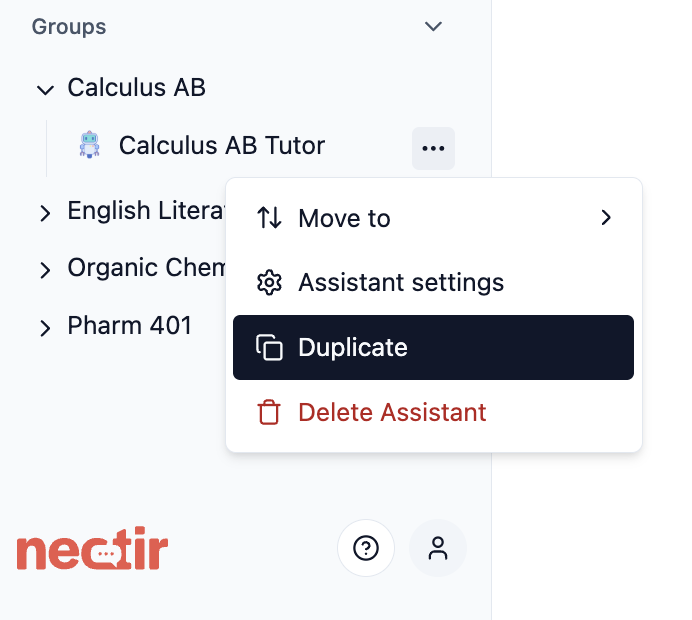
Duplicate an Assistant
Duplicate an Assistant
Create a copy of an existing Assistant with all the same settings and configurations.How to duplicate:
- Hover over the Assistant name in the sidebar
- Click the three dots that appear
- Select Duplicate
- The system creates a copy in the same Group with “Copy” appended to the name
- Create variations with minor differences
- Test new configurations without affecting the original
- Deploy similar Assistants across different Groups
- Keep a backup before making major changes
Move an Assistant
Move an Assistant
Transfer an Assistant from one Group to another to change access permissions.How to move:
- Hover over the Assistant name in the sidebar
- Click the three dots that appear
- Select Move To
- Choose the destination Group from the dropdown
- Transition from private development to public Group
- Reorganize for different semesters or terms
- Change which students or faculty have access
- Consolidate Assistants from different Groups
The Assistant will be transferred with all settings and training data intact.
Delete an Assistant
Delete an Assistant
Permanently remove an Assistant that’s no longer needed.How to delete:
- Hover over the Assistant name in the sidebar
- Click the three dots that appear
- Select Delete Assistant
- Confirm the deletion when prompted
Next Steps
Assistant Knowledge
Define what information your Assistant can access
Assistant Prompt
Set the directions that shape your Assistant’s behavior
Add to a Canvas Course
Put your Assistant in front of students in the course sidebar, a page, an assignment, or a module
Video Tutorial
Watch the Complete Walkthrough
See the entire Assistant creation process from start to finish