> ## Documentation Index
> Fetch the complete documentation index at: https://support.nectir.io/llms.txt
> Use this file to discover all available pages before exploring further.
# Add Nectir to a Canvas Course
> Four ways to add a Nectir Assistant to a Canvas course: in the course sidebar, in a page, in an assignment, or in a module.
## Overview
The way you add Nectir AI to a Canvas course depends on whether your institution has the **Canvas LTI integration** set up:
Use one of the **four LTI methods** below: add Nectir to the course sidebar, or embed an Assistant inside a page, assignment, or module.
Share your Assistant's **invite link**, **invite students by email**, or add a **redirect link** in your course sidebar. No admin setup required.
## With the Canvas LTI Integration
If your institution has the Canvas LTI integration installed, there are four ways to add Nectir AI to a course:
* **Course navigation sidebar**: whole-course AI hub linked to a Nectir Group
* **Inside a page**: embed a specific Assistant on a syllabus, intro, or instructions page
* **Inside an assignment**: embed a specific Assistant tied to a task or problem set
* **Inside a module**: add an Assistant as a standalone module item
### Before You Begin
Your institution's Canvas administrator must have already completed the one-time LTI setup. Specifically:
* **Canvas LTI must be installed.** If you don't see **Nectir AI** anywhere in Canvas, your admin hasn't installed the integration yet. See the [Canvas LTI Guided Setup](/lms-integrations/canvas-lti-guided) for admin instructions, or skip ahead to [Without the Canvas LTI Integration](#without-the-canvas-lti-integration).
* **For Methods 2, 3, and 4:** the **deep linking placements** must be in place. New Canvas installs include them automatically. If the Apps button doesn't show **Nectir AI** in the Rich Content Editor, or **Nectir AI** doesn't appear when you add an External Tool to a module, your institution likely set up Nectir AI before these placements existed. Ask your Canvas admin to apply the [Deep Linking Placements update](/lms-integrations/canvas-lti-updates#deep-linking-placements).
If you're not sure whether your institution has completed setup, contact your Canvas administrator or [support@nectir.io](mailto:support@nectir.io).
### Four Ways to Add Nectir
Expand any method below for the full walkthrough.
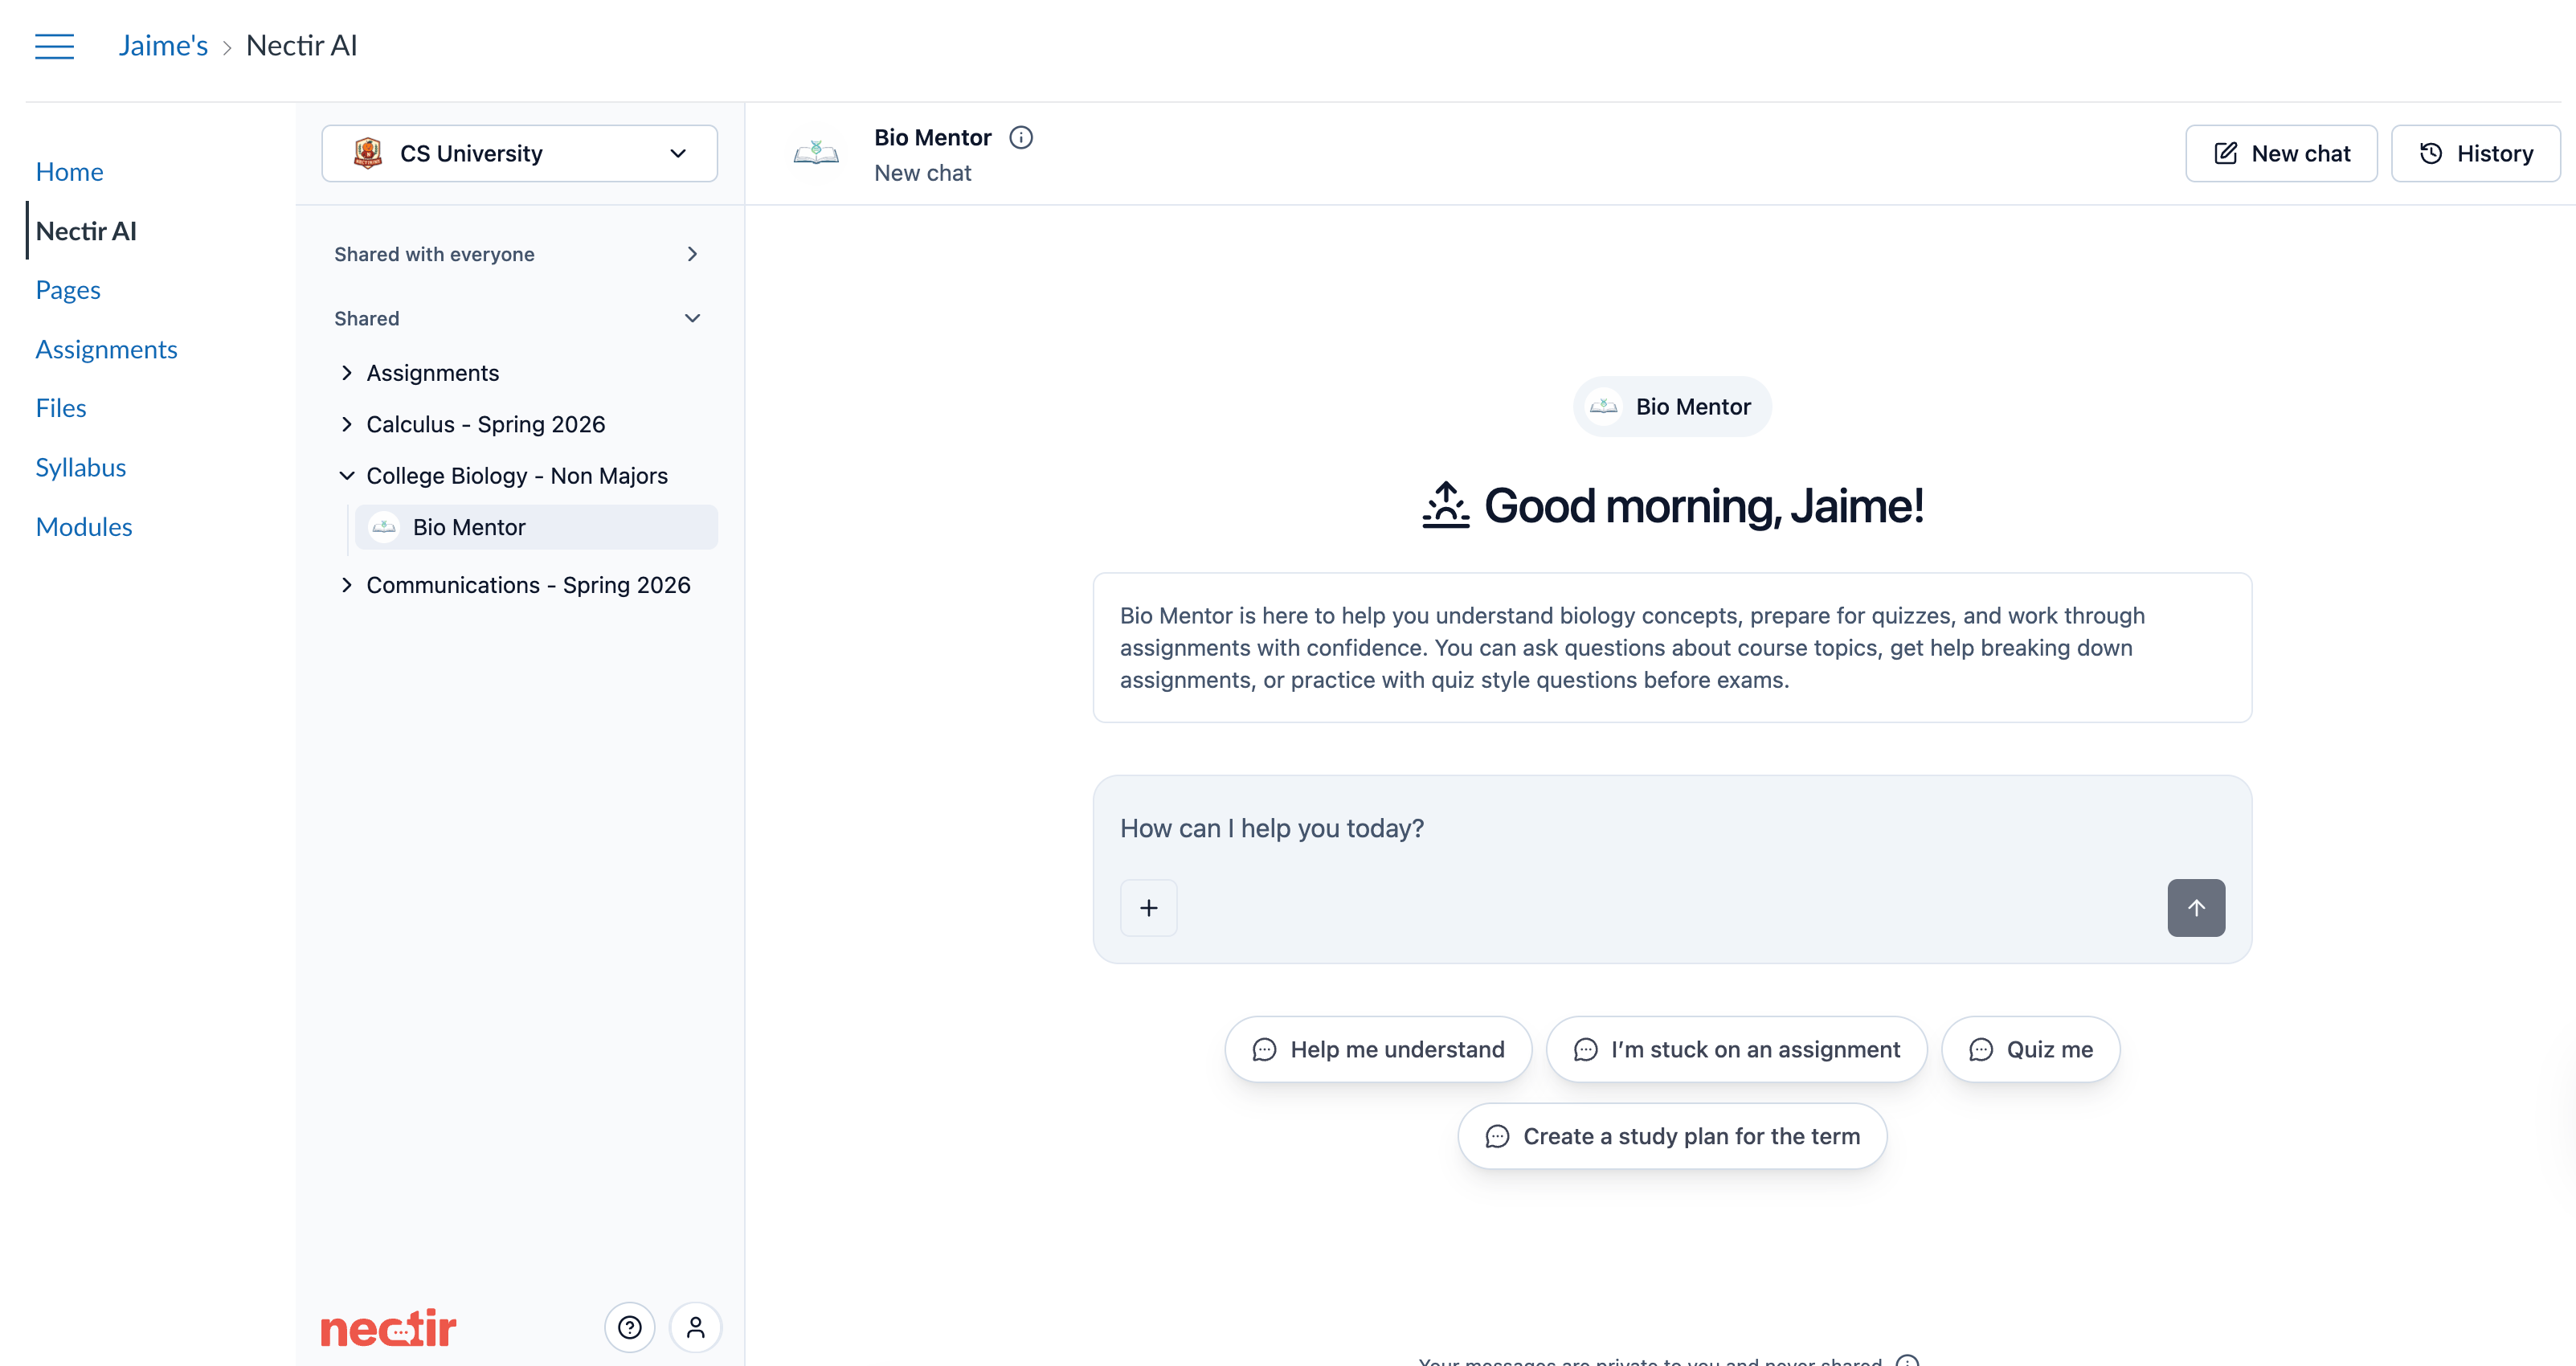 Use this method when you want students to access a course-wide Assistant from anywhere in the course.
When you add **Nectir AI** to the course sidebar, you're linking the whole Canvas course to a Nectir Group. Anyone enrolled in the course gets access to the Assistants in that Group.
**Automatic access.** Once your Canvas course is linked, everyone enrolled in that course (students, instructors, and TAs) gets access to the linked Group automatically. No separate invitations are required. Roles in Nectir are assigned based on Canvas roles via [LMS Role Mapping](/getting-started/workspace-settings#lms-role-mapping).
**Access Nectir AI from Canvas**
Go to the Canvas course you want to link with Nectir AI.
Navigate to **Settings** > **Navigation** tab.
Find **Nectir AI** in the disabled items section. You can either:
* Click the three-dot menu next to **Nectir AI** and select **Enable**
* Drag the **Nectir AI** item up to the active navigation items section
Save your changes after enabling.
Click on **Nectir AI** in your course navigation menu to begin the linking process.
**Choose Your Linking Option**
When accessing Nectir AI from Canvas for the first time, you'll see linking options:
Use this method when you want students to access a course-wide Assistant from anywhere in the course.
When you add **Nectir AI** to the course sidebar, you're linking the whole Canvas course to a Nectir Group. Anyone enrolled in the course gets access to the Assistants in that Group.
**Automatic access.** Once your Canvas course is linked, everyone enrolled in that course (students, instructors, and TAs) gets access to the linked Group automatically. No separate invitations are required. Roles in Nectir are assigned based on Canvas roles via [LMS Role Mapping](/getting-started/workspace-settings#lms-role-mapping).
**Access Nectir AI from Canvas**
Go to the Canvas course you want to link with Nectir AI.
Navigate to **Settings** > **Navigation** tab.
Find **Nectir AI** in the disabled items section. You can either:
* Click the three-dot menu next to **Nectir AI** and select **Enable**
* Drag the **Nectir AI** item up to the active navigation items section
Save your changes after enabling.
Click on **Nectir AI** in your course navigation menu to begin the linking process.
**Choose Your Linking Option**
When accessing Nectir AI from Canvas for the first time, you'll see linking options:
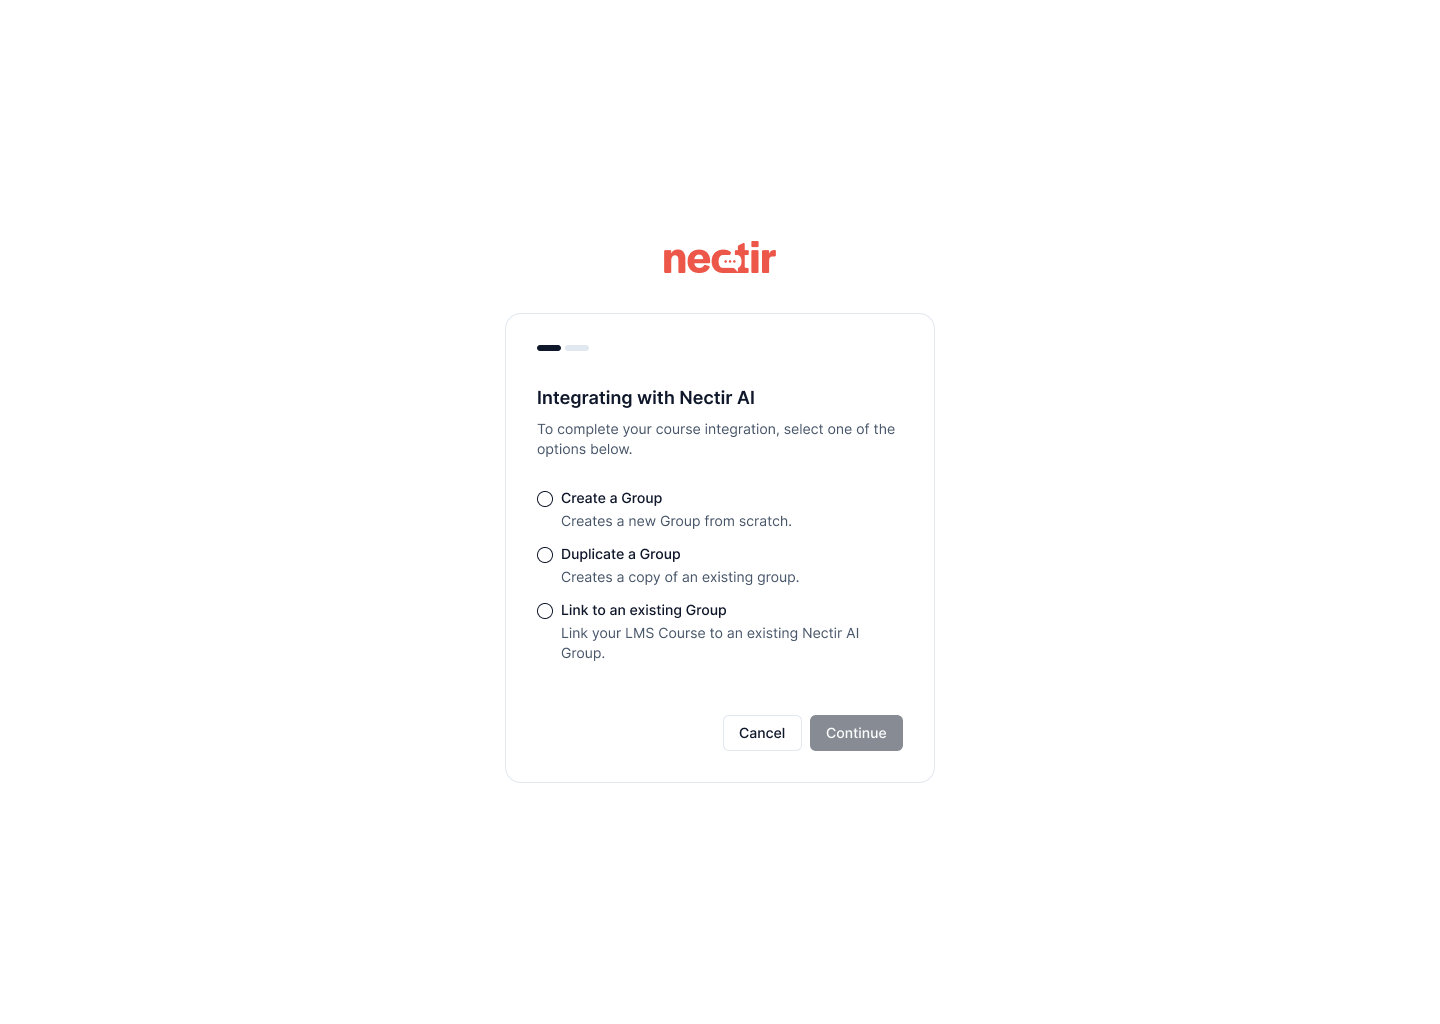 **For first-time users:** you only see the **Create a Group** option, which creates a brand new Nectir AI Group specifically for this Canvas course.
**For existing Nectir users:** you see three options:
* **Create a Group**: Start fresh with a new Group specifically for this Canvas course
* **Duplicate a Group**: Copy an existing Group's settings and Assistants for use with this Canvas course (perfect for reusing Assistants from previous semesters)
* **Link to an Existing Group**: Connect this Canvas course to a Group you've already been working on (useful for cross-listed or multi-section courses)
Most instructors use "Duplicate a Group" at the start of each semester to reuse their successful Assistants while keeping each semester's students separate.
**Roster Sync**
After linking your course to a Group, Nectir prompts you to sync your course roster. You can complete this now or skip it and sync later after you've finished setting up your Assistants.
**Important**: Roster sync does not control access. Once your course is linked, users can access Nectir AI through the LMS regardless of whether they've been roster synced. Roster sync simply imports user names into your member list and optionally sends invitation emails.
For complete information on roster sync, including when to use it and how to send invitation emails, see [Roster Sync](/user-management/roster-sync).
**For first-time users:** you only see the **Create a Group** option, which creates a brand new Nectir AI Group specifically for this Canvas course.
**For existing Nectir users:** you see three options:
* **Create a Group**: Start fresh with a new Group specifically for this Canvas course
* **Duplicate a Group**: Copy an existing Group's settings and Assistants for use with this Canvas course (perfect for reusing Assistants from previous semesters)
* **Link to an Existing Group**: Connect this Canvas course to a Group you've already been working on (useful for cross-listed or multi-section courses)
Most instructors use "Duplicate a Group" at the start of each semester to reuse their successful Assistants while keeping each semester's students separate.
**Roster Sync**
After linking your course to a Group, Nectir prompts you to sync your course roster. You can complete this now or skip it and sync later after you've finished setting up your Assistants.
**Important**: Roster sync does not control access. Once your course is linked, users can access Nectir AI through the LMS regardless of whether they've been roster synced. Roster sync simply imports user names into your member list and optionally sends invitation emails.
For complete information on roster sync, including when to use it and how to send invitation emails, see [Roster Sync](/user-management/roster-sync).
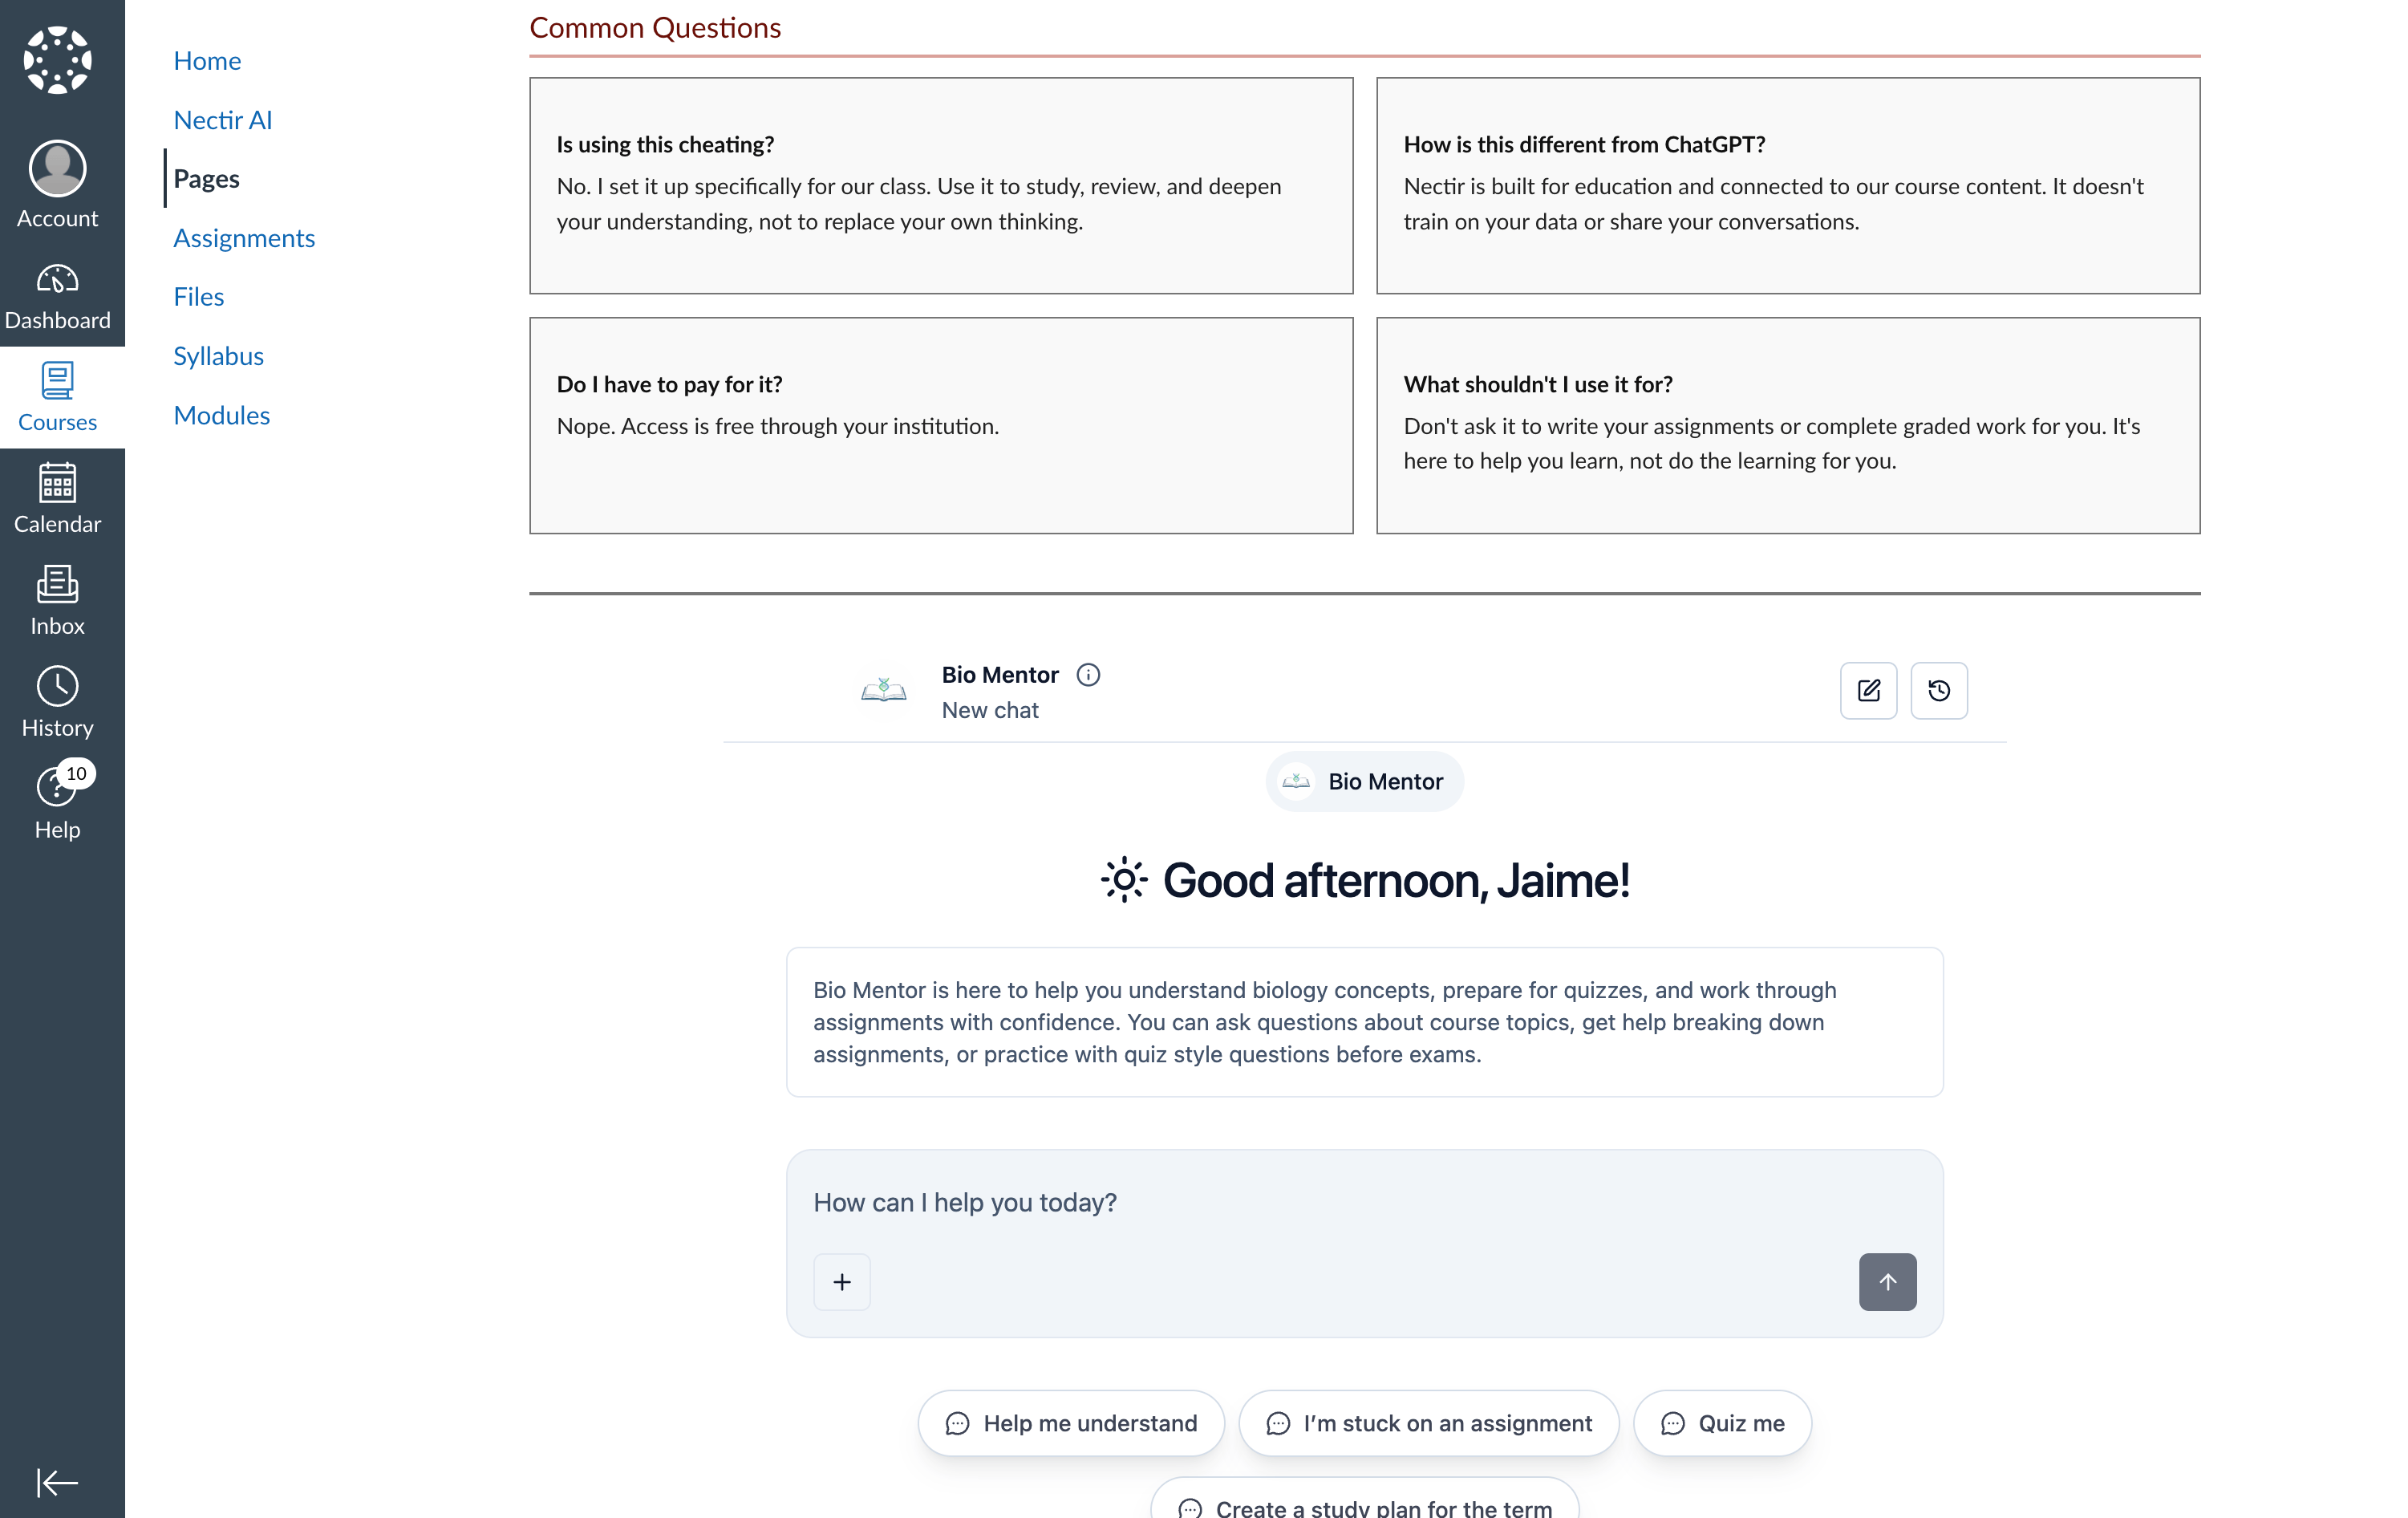 Use this method when you want a specific Assistant to appear directly inside a Canvas page, like a syllabus, course introduction, or instructions page.
Go to **Pages** in your Canvas course, open the page you want to embed an Assistant in, and click **Edit**.
If you're creating a new page, click **+ Page** instead.
In the Rich Content Editor toolbar, click the **Apps** button (plug icon).
From the Apps dropdown, select **Nectir AI**.
In the **Embed an Assistant** modal, choose the Assistant you want to embed from the list.
Click **Embed Assistant**. The Assistant placeholder appears inside the page editor.
Click **Save** (or **Save & Publish**) at the bottom of the page.
Use this method when you want a specific Assistant to appear directly inside a Canvas page, like a syllabus, course introduction, or instructions page.
Go to **Pages** in your Canvas course, open the page you want to embed an Assistant in, and click **Edit**.
If you're creating a new page, click **+ Page** instead.
In the Rich Content Editor toolbar, click the **Apps** button (plug icon).
From the Apps dropdown, select **Nectir AI**.
In the **Embed an Assistant** modal, choose the Assistant you want to embed from the list.
Click **Embed Assistant**. The Assistant placeholder appears inside the page editor.
Click **Save** (or **Save & Publish**) at the bottom of the page.
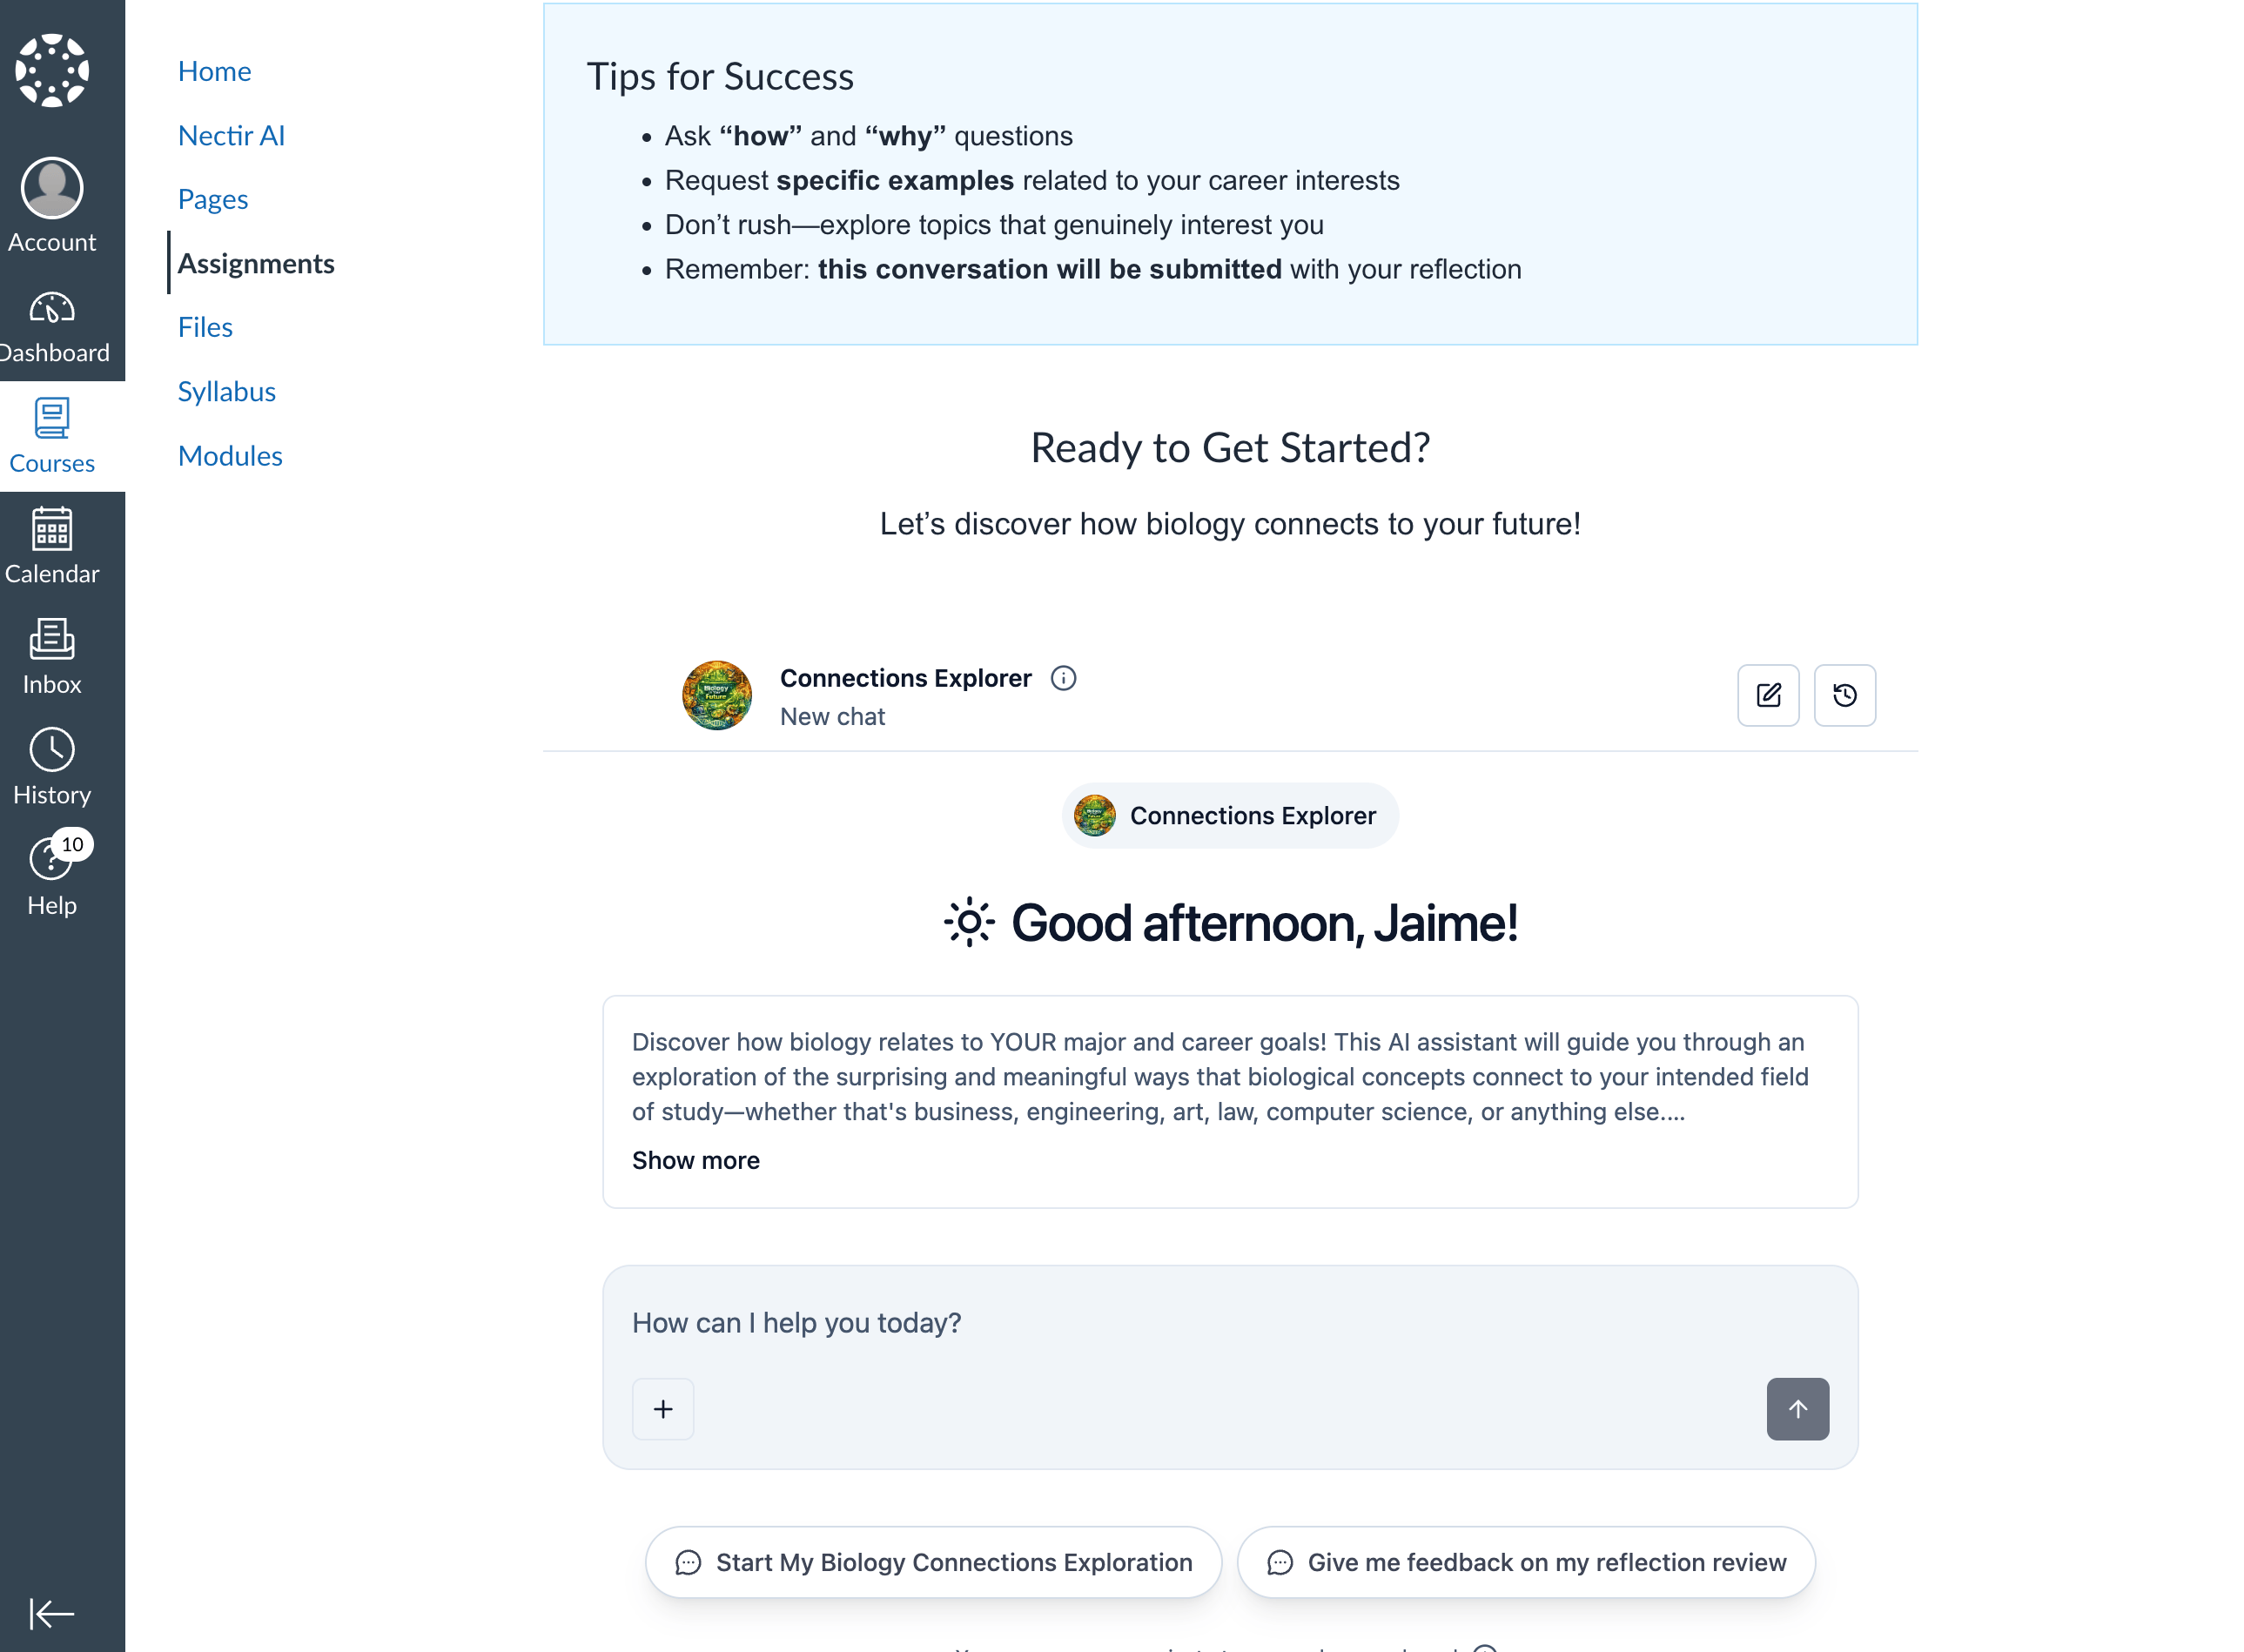 Use this method when an Assistant is tied to a specific task, problem set, or activity. Students see the Assistant inline with the assignment instructions. The flow is identical to Method 2 because Canvas assignments use the same Rich Content Editor.
Go to **Assignments** in your Canvas course, open the assignment you want to embed an Assistant in, and click **Edit**.
If you're creating a new assignment, click **+ Assignment** instead.
In the Rich Content Editor toolbar, click the **Apps** button (plug icon).
From the Apps dropdown, select **Nectir AI**.
In the **Embed an Assistant** modal, choose the Assistant you want to embed from the list.
Click **Embed Assistant**. The Assistant placeholder appears inside the assignment editor.
Configure the rest of the assignment (points, due date, submission type) and click **Save** (or **Save & Publish**).
Use this method when an Assistant is tied to a specific task, problem set, or activity. Students see the Assistant inline with the assignment instructions. The flow is identical to Method 2 because Canvas assignments use the same Rich Content Editor.
Go to **Assignments** in your Canvas course, open the assignment you want to embed an Assistant in, and click **Edit**.
If you're creating a new assignment, click **+ Assignment** instead.
In the Rich Content Editor toolbar, click the **Apps** button (plug icon).
From the Apps dropdown, select **Nectir AI**.
In the **Embed an Assistant** modal, choose the Assistant you want to embed from the list.
Click **Embed Assistant**. The Assistant placeholder appears inside the assignment editor.
Configure the rest of the assignment (points, due date, submission type) and click **Save** (or **Save & Publish**).
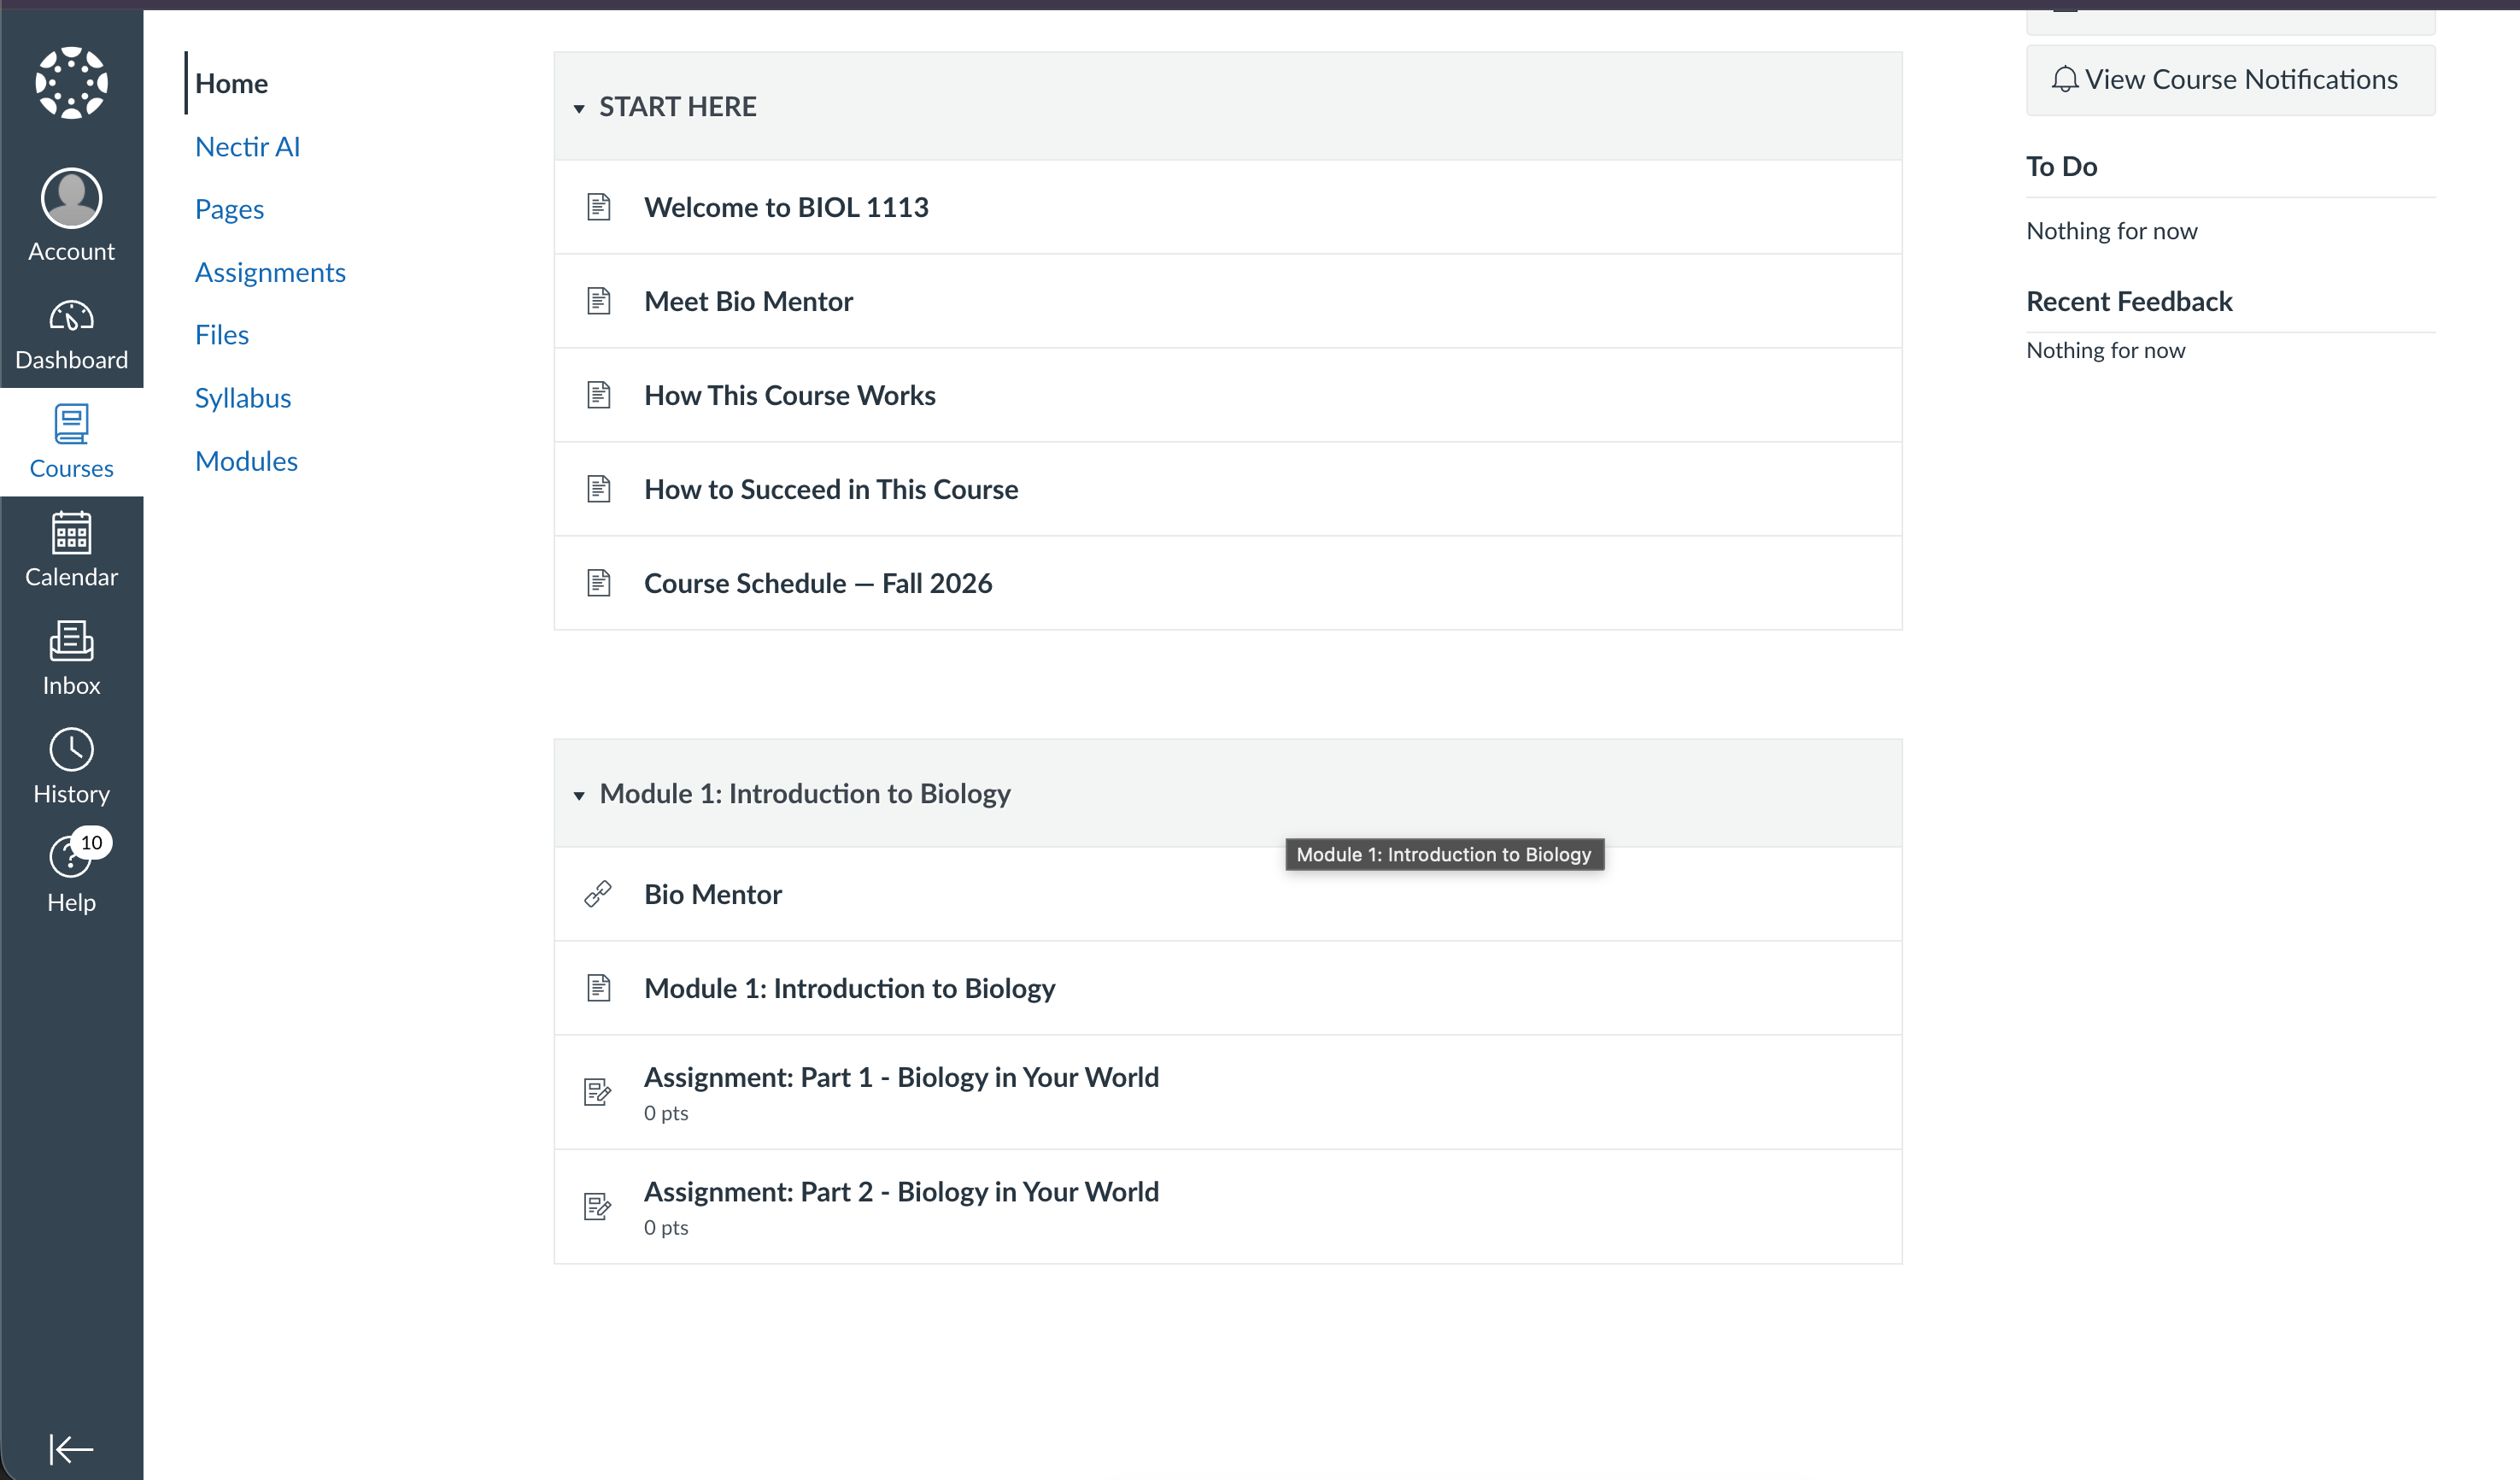 Use this method when the Assistant should appear as its own item in a module, sequenced alongside other course content. Students click the module item to open the Assistant in full view.
Modules use a different flow than pages and assignments. Instead of the **Apps** button in the Rich Content Editor, you add the Assistant as an **External Tool** module item.
Go to **Modules** in your Canvas course.
Click the **+** button on the module where you want to add the Assistant.
In the **Add Item** dialog, change the **Add** dropdown to **External Tool**.
From the list of external tools, select **Nectir AI**.
In the **Embed an Assistant** modal, choose the Assistant you want and click **Embed Assistant**.
Click **Add Item** to place the Assistant in the module.
## Without the Canvas LTI Integration
If your institution hasn't set up the Canvas LTI integration, you can still get Nectir AI in front of your students through one of three options below.
Every Nectir Assistant has a shareable invite link. Paste it anywhere in Canvas where students will see it: a page, an assignment description, an announcement, or as an External URL module item.
Go to [ai.nectir.io](https://ai.nectir.io) and open the Assistant you want to share.
Click **Invite Students**, then click **Copy Link**.
Paste the link anywhere students can click it:
* Inside a Canvas page or assignment description (use the Rich Content Editor's link tool)
* In an announcement
* As a module item: **Modules** > **+** > **External URL**, then paste the link and give it a name like "Nectir AI"
Send students a direct email invitation from Nectir. They'll click the link in the email, sign in to Nectir AI, and land in your Group with access to your Assistants.
Go to [ai.nectir.io](https://ai.nectir.io) and open the Group that contains the Assistant you want to share.
Hover over the Group on the left sidebar, click the three-dot menu, and select **Invite Members**. Then click **Invite members** at the top right.
Copy and paste your students' school-provided emails. You can paste directly from your roster: emails will be automatically extracted from the surrounding text.
Customize the invitation message to provide context for your students. Choose whether to send to **Everyone** in the list or only **New people**.
Click **Send Invite**. Students receive an email with a sign-in link.
For full details on email invitations, including the Members tab and managing access, see [Inviting Users to Groups](/user-management/inviting-users#inviting-users-to-groups).
Use Canvas's built-in **Redirect Tool** to add a sidebar link that opens Nectir AI directly. This mimics the look of the LTI sidebar method without requiring an admin to install the LTI app.
Follow Option 1, Steps 1 and 2 above to copy your Assistant's invite link.
In your Canvas course, go to **Settings** > **Apps** > **View App Configurations**.
Click **+ App**. In the **Configuration Type** dropdown, select **Manual Entry**. Fill in:
* **Name**: `Nectir AI`
* **Consumer Key**: leave blank
* **Shared Secret**: leave blank
* **Launch URL**: paste your Assistant's invite link
* **Domain**: `ai.nectir.io`
Click **Submit**.
Go to **Settings** > **Navigation**. Find **Nectir AI** in the disabled section and drag it up into the active navigation. Click **Save**.
## Managing Courses Across Terms
Nectir's flexible setup framework allows you to link and unlink LMS courses as needed:
You can link as many LMS courses to Nectir as you need. Each course can be linked to its own Group or share a Group with other courses (useful for cross-listed sections).
**How to link a course:**
1. Open your new Canvas course
2. Access Nectir AI from the course navigation
3. You'll be prompted to choose how to link the course to a Group
When a term ends, you can unlink the LMS course from the Nectir Group. This removes the course connection while preserving the Group and all Assistants for future use.
**How to unlink a course:**
1. Go to **Group Settings**
2. Navigate to **LMS Integration**
3. Click the three dots next to the course you want to unlink
4. Select **Unlink**
Unlinking a course will remove access for all users within that LMS course. The Group and Assistants will remain intact for future use.
When setting up the same course for a new term, you have two approaches:
**Link to Existing Group** (Iterate and Improve):
* Connect your new course to the same Group you used previously
* Keep using and improving the same Assistants term over term
* Build on previous refinements and knowledge base updates
* Best for: Instructors who want to continuously improve their Assistants based on student interactions
**Duplicate Group** (Preserve Past Versions):
* Create a copy of your previous Group with all Assistants
* Maintain separate versions for each term
* Preserve historical Assistant configurations
* Best for: Instructors who want to keep distinct versions per term or experiment with different approaches
Most instructors who teach the same course repeatedly prefer to link back to existing Groups, allowing them to refine and improve their Assistants over time rather than starting fresh each term.
## Troubleshooting
Use this method when the Assistant should appear as its own item in a module, sequenced alongside other course content. Students click the module item to open the Assistant in full view.
Modules use a different flow than pages and assignments. Instead of the **Apps** button in the Rich Content Editor, you add the Assistant as an **External Tool** module item.
Go to **Modules** in your Canvas course.
Click the **+** button on the module where you want to add the Assistant.
In the **Add Item** dialog, change the **Add** dropdown to **External Tool**.
From the list of external tools, select **Nectir AI**.
In the **Embed an Assistant** modal, choose the Assistant you want and click **Embed Assistant**.
Click **Add Item** to place the Assistant in the module.
## Without the Canvas LTI Integration
If your institution hasn't set up the Canvas LTI integration, you can still get Nectir AI in front of your students through one of three options below.
Every Nectir Assistant has a shareable invite link. Paste it anywhere in Canvas where students will see it: a page, an assignment description, an announcement, or as an External URL module item.
Go to [ai.nectir.io](https://ai.nectir.io) and open the Assistant you want to share.
Click **Invite Students**, then click **Copy Link**.
Paste the link anywhere students can click it:
* Inside a Canvas page or assignment description (use the Rich Content Editor's link tool)
* In an announcement
* As a module item: **Modules** > **+** > **External URL**, then paste the link and give it a name like "Nectir AI"
Send students a direct email invitation from Nectir. They'll click the link in the email, sign in to Nectir AI, and land in your Group with access to your Assistants.
Go to [ai.nectir.io](https://ai.nectir.io) and open the Group that contains the Assistant you want to share.
Hover over the Group on the left sidebar, click the three-dot menu, and select **Invite Members**. Then click **Invite members** at the top right.
Copy and paste your students' school-provided emails. You can paste directly from your roster: emails will be automatically extracted from the surrounding text.
Customize the invitation message to provide context for your students. Choose whether to send to **Everyone** in the list or only **New people**.
Click **Send Invite**. Students receive an email with a sign-in link.
For full details on email invitations, including the Members tab and managing access, see [Inviting Users to Groups](/user-management/inviting-users#inviting-users-to-groups).
Use Canvas's built-in **Redirect Tool** to add a sidebar link that opens Nectir AI directly. This mimics the look of the LTI sidebar method without requiring an admin to install the LTI app.
Follow Option 1, Steps 1 and 2 above to copy your Assistant's invite link.
In your Canvas course, go to **Settings** > **Apps** > **View App Configurations**.
Click **+ App**. In the **Configuration Type** dropdown, select **Manual Entry**. Fill in:
* **Name**: `Nectir AI`
* **Consumer Key**: leave blank
* **Shared Secret**: leave blank
* **Launch URL**: paste your Assistant's invite link
* **Domain**: `ai.nectir.io`
Click **Submit**.
Go to **Settings** > **Navigation**. Find **Nectir AI** in the disabled section and drag it up into the active navigation. Click **Save**.
## Managing Courses Across Terms
Nectir's flexible setup framework allows you to link and unlink LMS courses as needed:
You can link as many LMS courses to Nectir as you need. Each course can be linked to its own Group or share a Group with other courses (useful for cross-listed sections).
**How to link a course:**
1. Open your new Canvas course
2. Access Nectir AI from the course navigation
3. You'll be prompted to choose how to link the course to a Group
When a term ends, you can unlink the LMS course from the Nectir Group. This removes the course connection while preserving the Group and all Assistants for future use.
**How to unlink a course:**
1. Go to **Group Settings**
2. Navigate to **LMS Integration**
3. Click the three dots next to the course you want to unlink
4. Select **Unlink**
Unlinking a course will remove access for all users within that LMS course. The Group and Assistants will remain intact for future use.
When setting up the same course for a new term, you have two approaches:
**Link to Existing Group** (Iterate and Improve):
* Connect your new course to the same Group you used previously
* Keep using and improving the same Assistants term over term
* Build on previous refinements and knowledge base updates
* Best for: Instructors who want to continuously improve their Assistants based on student interactions
**Duplicate Group** (Preserve Past Versions):
* Create a copy of your previous Group with all Assistants
* Maintain separate versions for each term
* Preserve historical Assistant configurations
* Best for: Instructors who want to keep distinct versions per term or experiment with different approaches
Most instructors who teach the same course repeatedly prefer to link back to existing Groups, allowing them to refine and improve their Assistants over time rather than starting fresh each term.
## Troubleshooting
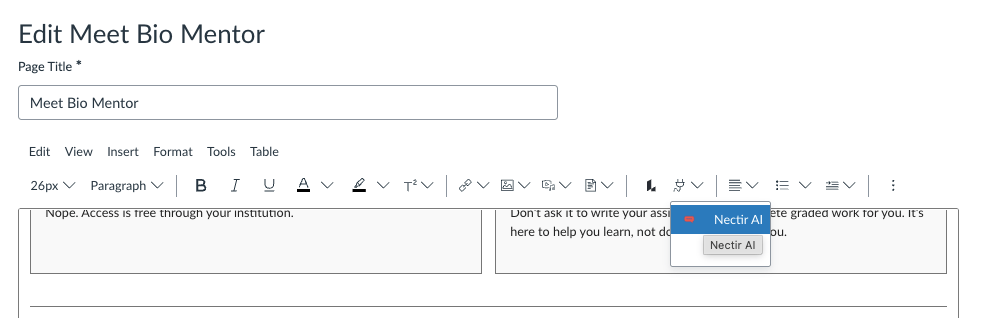 The Apps button (plug icon) appears in the editor toolbar for pages and assignments.
If the Apps button is there but **Nectir AI** isn't in the dropdown, your Canvas admin needs to enable the **Editor Button** deep linking placement. Share the [Deep Linking Placements update](/lms-integrations/canvas-lti-updates#deep-linking-placements) with them.
Your Canvas admin needs to enable the **Link Selection** deep linking placement. Share the [Deep Linking Placements update](/lms-integrations/canvas-lti-updates#deep-linking-placements) with them.
The list shows:
* Any **Shared with everyone** Assistant. These are institutional resources, always available to everyone in the Workspace, including standalone Assistants that don't belong to a Group.
* **Private** or **Shared** Assistants in Groups where you are an **owner**.
The list does not show:
* **Private** or **Shared** Assistants in Groups where you are only a member (you can chat with them, but you're not an owner).
* Assistants in Groups you don't belong to.
If the Assistant you're looking for isn't listed, it's most likely a Private or Shared Assistant in a Group you don't own. Ask the Group owner to embed it, or to make you an owner of the Group. Also confirm you're in the right Workspace, then contact [support@nectir.io](mailto:support@nectir.io).
Check that:
* The page, assignment, or module item is **published** (not in draft state).
* The student is enrolled in the Canvas course and has access to the Canvas resource (page, assignment, or module item) where the embed lives.
* Third-party cookies are allowed in the student's browser. See [Browser & Display Issues](/troubleshooting/troubleshooting#allow-third-party-cookies).
The course-to-Group linking step must be initiated from inside Canvas, not from the Nectir AI website. Open your Canvas course, click **Nectir AI** in the course navigation sidebar, and the linking screen will appear.
If **Nectir AI** isn't in the course sidebar yet, follow the **Method 1: Course Navigation Sidebar** steps above to enable it.
For other issues, see the [Canvas troubleshooting guide](/troubleshooting/canvas-issues) or contact [support@nectir.io](mailto:support@nectir.io).
## Related Resources
Admin checklist for the institution-level Canvas LTI setup
Build the Assistant you want to embed in your course
Manage the Group your Assistants live in
For Canvas admins: install and configure the Nectir AI LTI app
The Apps button (plug icon) appears in the editor toolbar for pages and assignments.
If the Apps button is there but **Nectir AI** isn't in the dropdown, your Canvas admin needs to enable the **Editor Button** deep linking placement. Share the [Deep Linking Placements update](/lms-integrations/canvas-lti-updates#deep-linking-placements) with them.
Your Canvas admin needs to enable the **Link Selection** deep linking placement. Share the [Deep Linking Placements update](/lms-integrations/canvas-lti-updates#deep-linking-placements) with them.
The list shows:
* Any **Shared with everyone** Assistant. These are institutional resources, always available to everyone in the Workspace, including standalone Assistants that don't belong to a Group.
* **Private** or **Shared** Assistants in Groups where you are an **owner**.
The list does not show:
* **Private** or **Shared** Assistants in Groups where you are only a member (you can chat with them, but you're not an owner).
* Assistants in Groups you don't belong to.
If the Assistant you're looking for isn't listed, it's most likely a Private or Shared Assistant in a Group you don't own. Ask the Group owner to embed it, or to make you an owner of the Group. Also confirm you're in the right Workspace, then contact [support@nectir.io](mailto:support@nectir.io).
Check that:
* The page, assignment, or module item is **published** (not in draft state).
* The student is enrolled in the Canvas course and has access to the Canvas resource (page, assignment, or module item) where the embed lives.
* Third-party cookies are allowed in the student's browser. See [Browser & Display Issues](/troubleshooting/troubleshooting#allow-third-party-cookies).
The course-to-Group linking step must be initiated from inside Canvas, not from the Nectir AI website. Open your Canvas course, click **Nectir AI** in the course navigation sidebar, and the linking screen will appear.
If **Nectir AI** isn't in the course sidebar yet, follow the **Method 1: Course Navigation Sidebar** steps above to enable it.
For other issues, see the [Canvas troubleshooting guide](/troubleshooting/canvas-issues) or contact [support@nectir.io](mailto:support@nectir.io).
## Related Resources
Admin checklist for the institution-level Canvas LTI setup
Build the Assistant you want to embed in your course
Manage the Group your Assistants live in
For Canvas admins: install and configure the Nectir AI LTI app