> ## Documentation Index
> Fetch the complete documentation index at: https://support.nectir.io/llms.txt
> Use this file to discover all available pages before exploring further.
# API Setup
> Connect Nectir AI to Canvas using the API integration to sync course materials and assignments
## Overview
The Canvas API integration connects your Nectir AI Workspace to Canvas, enabling you to import course materials like pages, assignments, files, discussion topics, and quizzes directly into your AI Assistants' knowledge base.
This guide covers the **API integration** method. If you're looking to embed Nectir AI directly inside Canvas courses via LTI, see the [Canvas LTI Guided Setup](/lms-integrations/canvas-lti-guided) instead.
### Prerequisites
* **Canvas Admin access** at the account level (to create Developer Keys)
* **Nectir AI Workspace Owner** role
### Before You Begin
You'll set this up by switching between two browser tabs, so open both before you start:
* **Nectir AI** with the Workspace you want to integrate
* **Canvas** with admin access at the account level
You'll begin in Nectir AI to open the credential form, then switch to Canvas to create the API key. The order matters here. Canvas shows the **Client Secret** only once, right when you save the key. With the Nectir AI form already open, you can copy the secret straight across before it disappears.
Canvas reveals the Client Secret a single time, right after you save the API key. Copy it into Nectir AI immediately. If you lose it, you'll need to [rotate the key's credentials](/lms-integrations/canvas-lti-rotate-credentials) to generate a new secret.
## Part 1: Start the API Integration in Nectir AI
In Nectir AI, click the **gear icon** next to your Workspace name, then select **LMS integration** in the settings sidebar.
Click **+ Add integration**, then click **Connect** under Canvas.
Select **API integration**. This opens the credential form with three fields: **Canvas instance URL**, **API key Client ID**, and **API key Client Secret**.
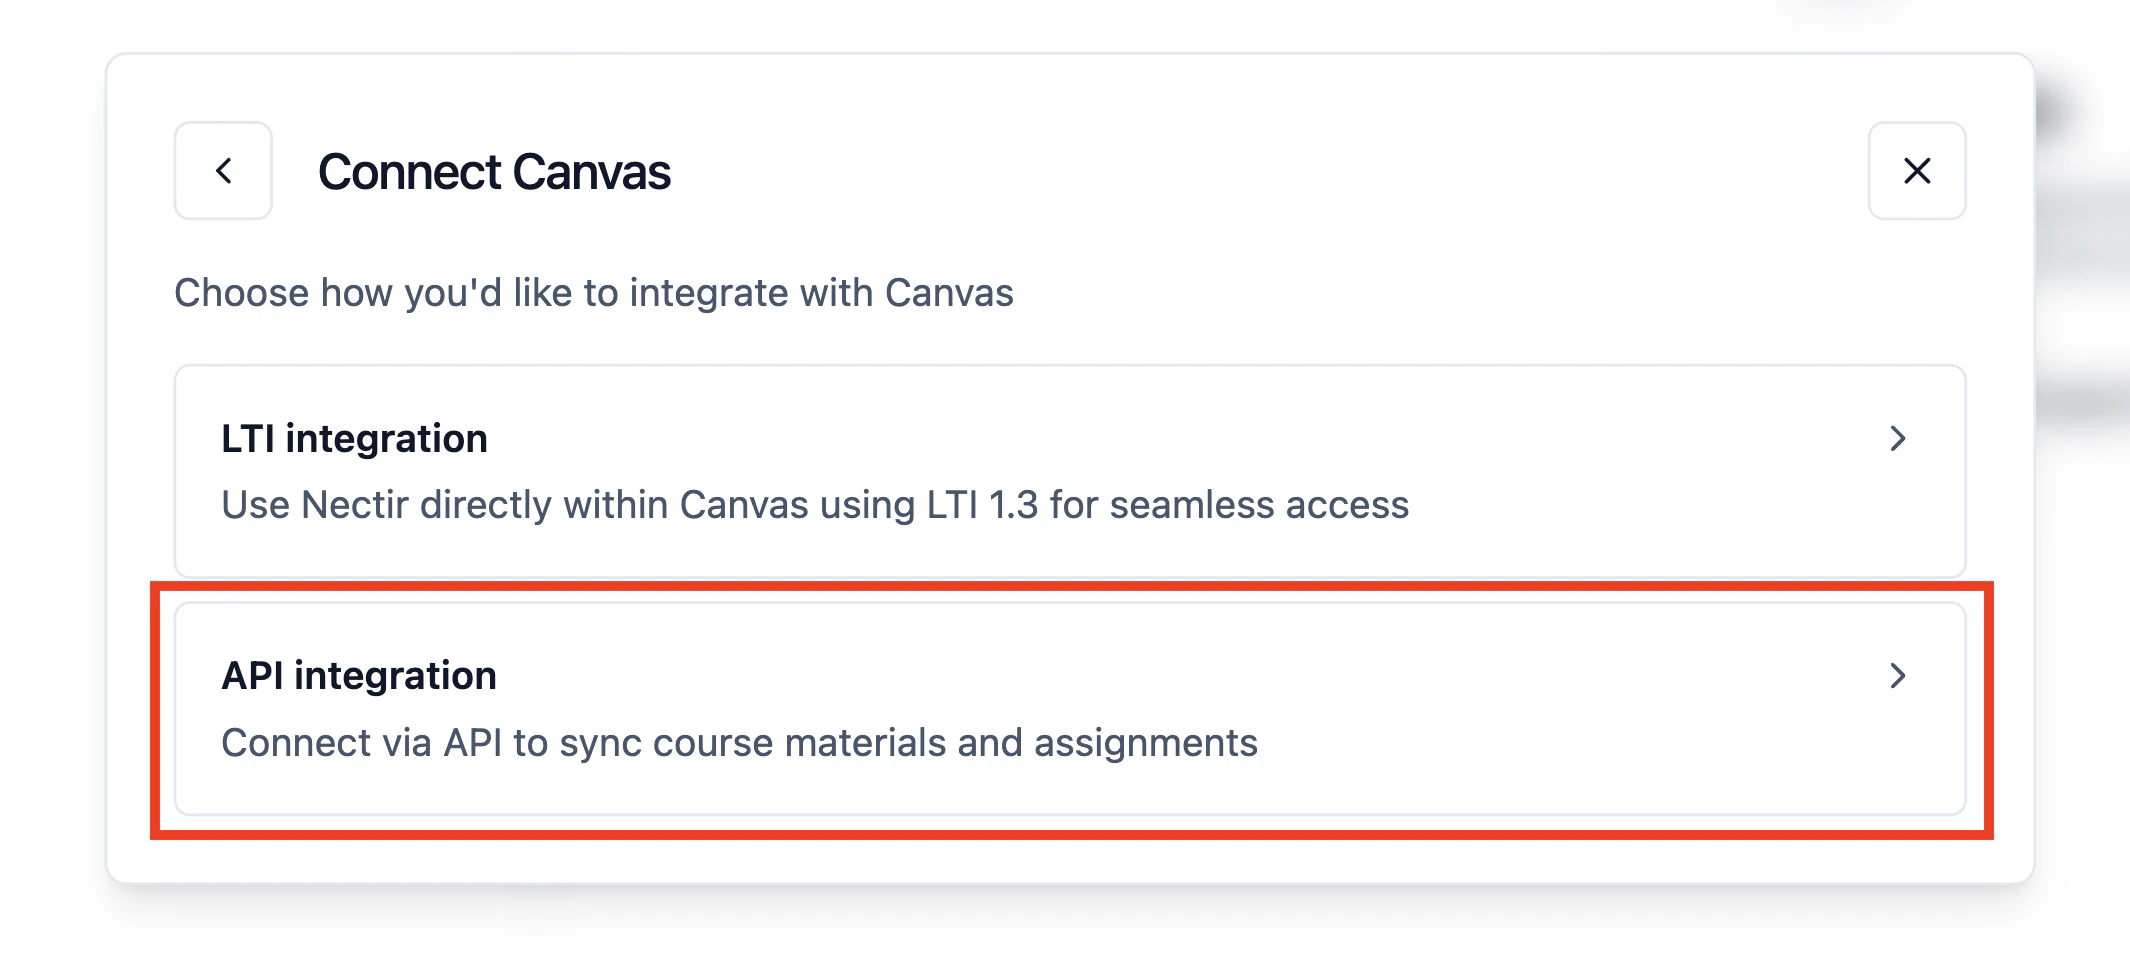 Leave this tab open on the credential form, then switch to your Canvas tab to create the API key.
## Part 2: Create an API Key in Canvas
In Canvas, click **Admin** in the left sidebar, select your account, then click **Developer Keys** in the account navigation.
Click the **+ Developer Key** button in the top right, then select **+ API Key** from the dropdown.
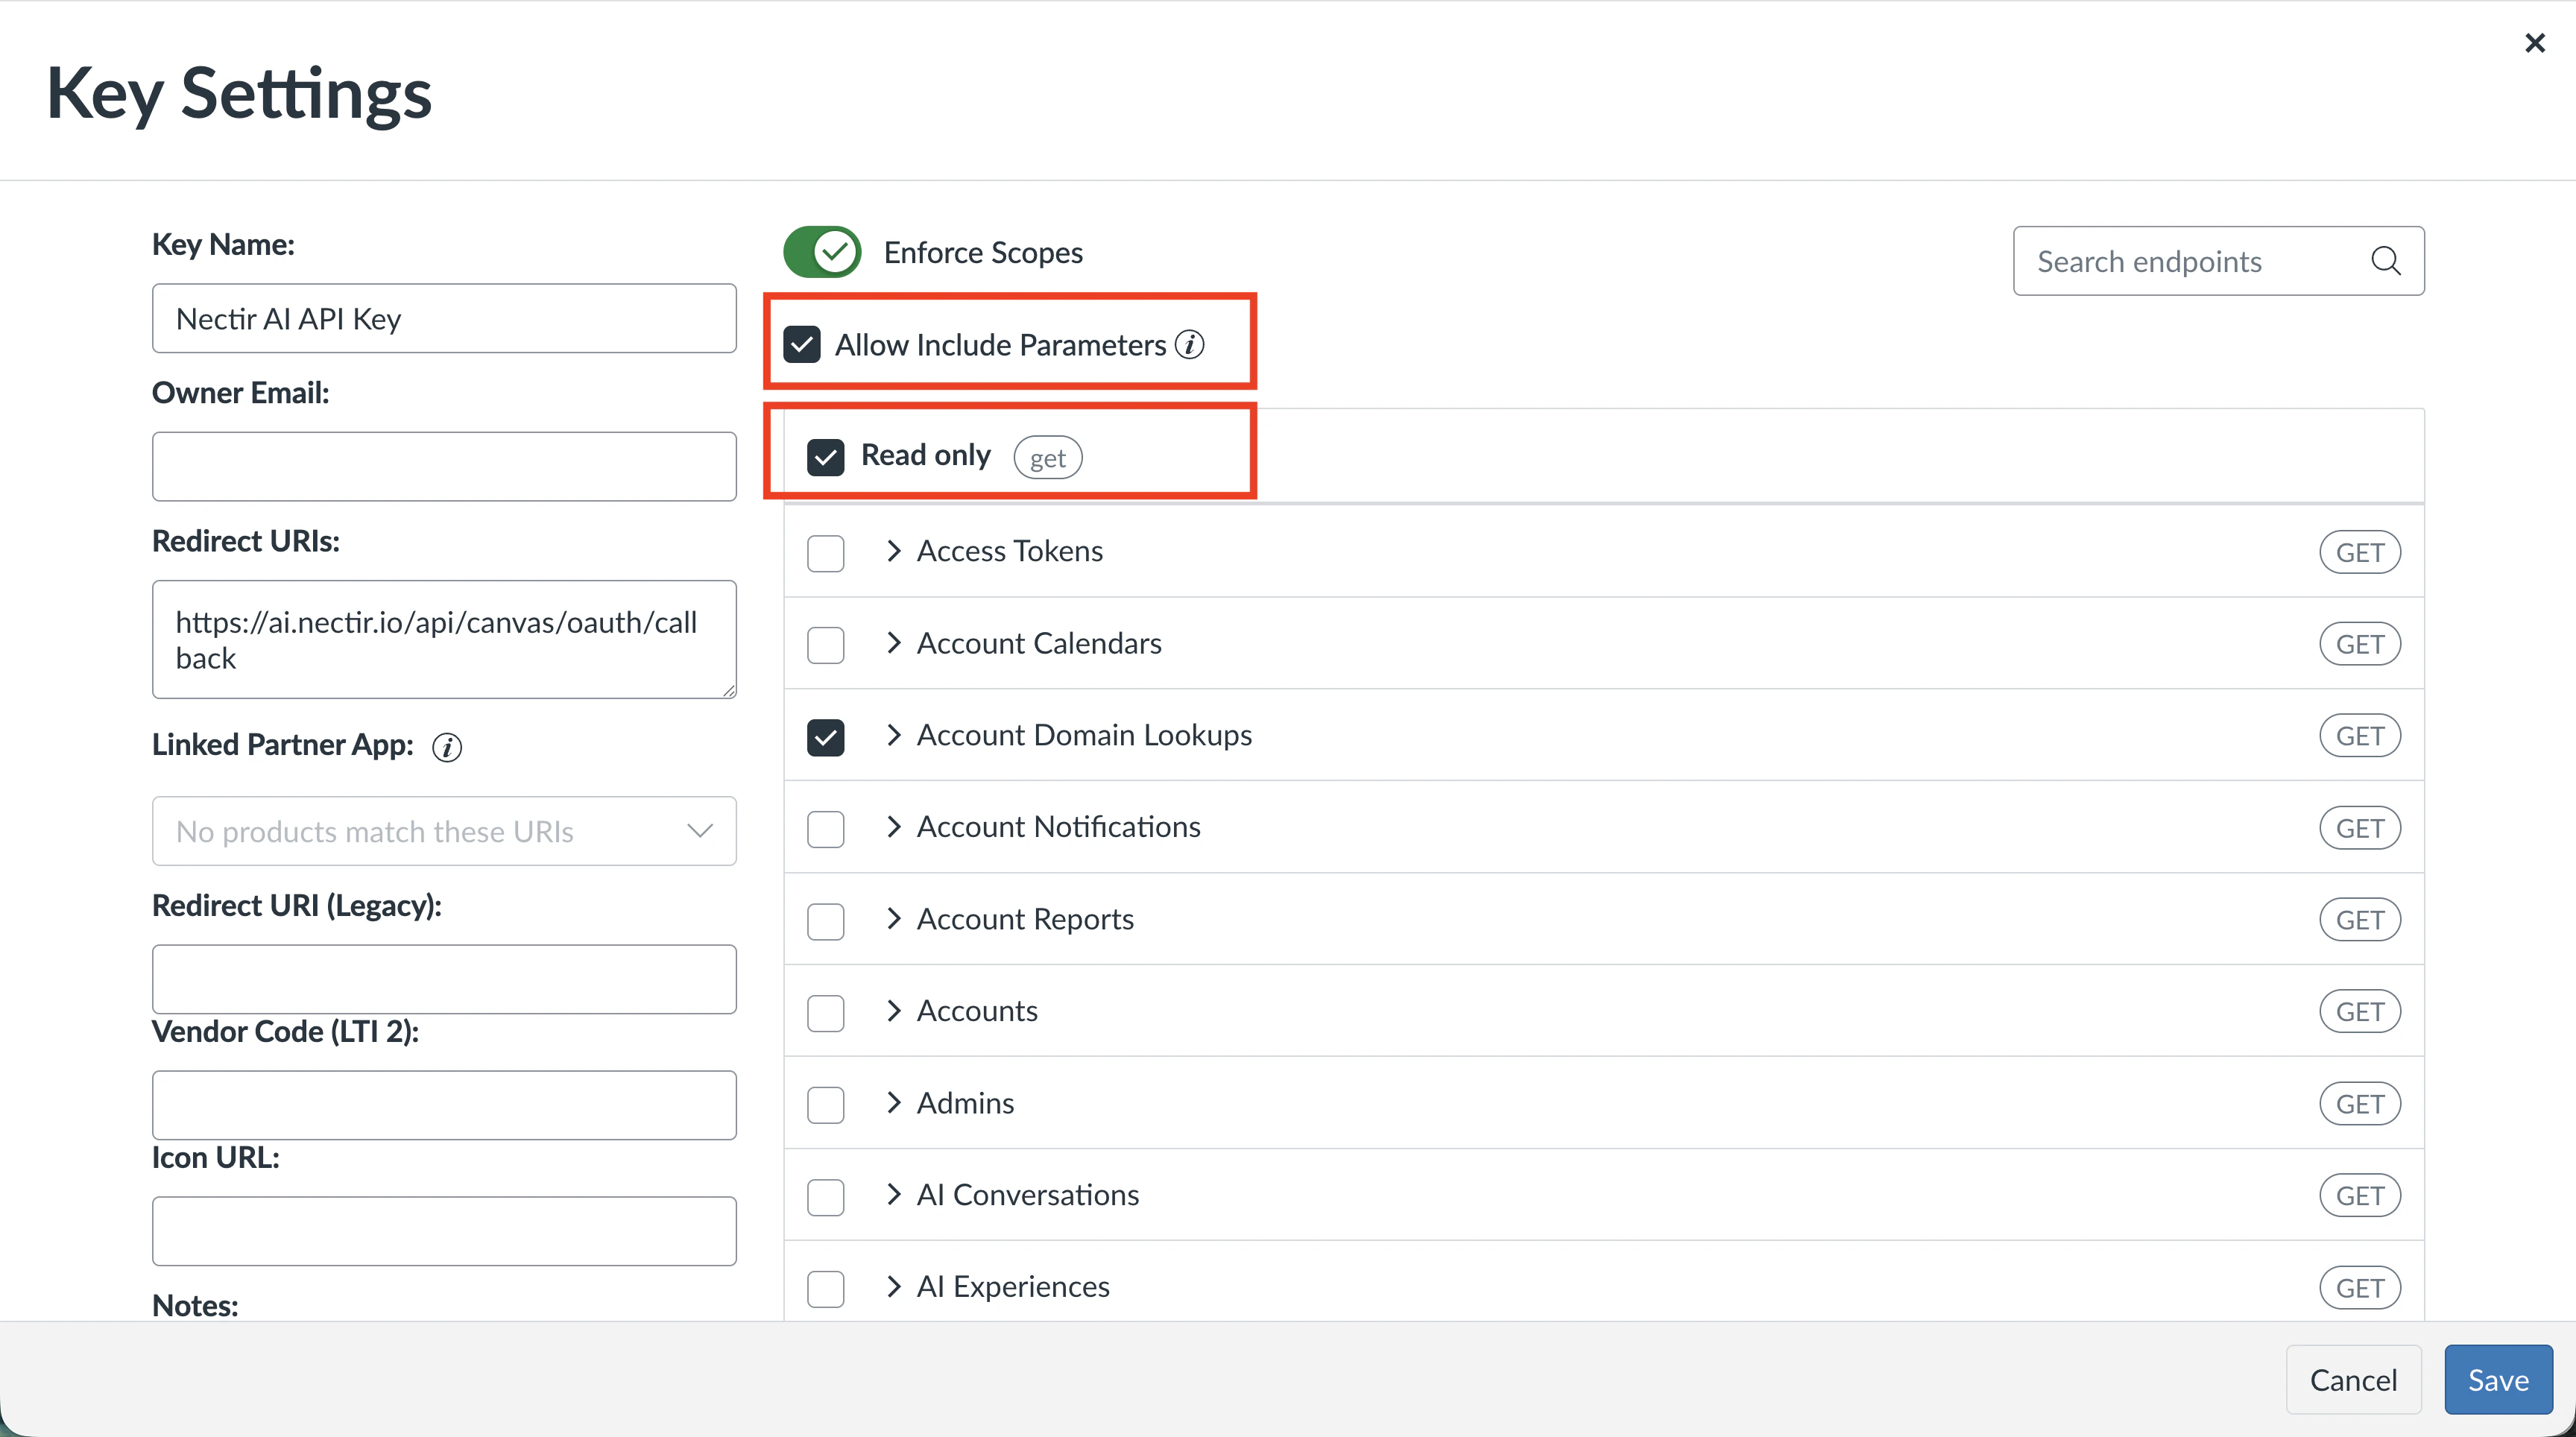
In the **Key Settings** form, fill in the following:
* **Key Name**: Enter a descriptive name (e.g., `Nectir AI API Key`)
* **Redirect URIs**: Enter the following URI exactly:
```
https://ai.nectir.io/api/canvas/oauth/callback
```
All other fields (Owner Email, Icon URL, Notes, etc.) can be left blank.
Keep the **Enforce Scopes** toggle turned **ON** (it's on by default).
Check the **Allow Include Parameters** checkbox. This lets Nectir AI surface additional course details (such as sub-account and instructor) in the course selector, making it easier to identify the right course when adding materials.
Check the **Read only** checkbox at the top of the scopes list. This grants read-only access to Canvas data, which is all Nectir AI needs.
The **Read only** option is the quickest way to configure scopes. Nectir AI only reads course data. It never modifies or deletes anything in Canvas.
Leave this tab open on the credential form, then switch to your Canvas tab to create the API key.
## Part 2: Create an API Key in Canvas
In Canvas, click **Admin** in the left sidebar, select your account, then click **Developer Keys** in the account navigation.
Click the **+ Developer Key** button in the top right, then select **+ API Key** from the dropdown.
In the **Key Settings** form, fill in the following:
* **Key Name**: Enter a descriptive name (e.g., `Nectir AI API Key`)
* **Redirect URIs**: Enter the following URI exactly:
```
https://ai.nectir.io/api/canvas/oauth/callback
```
All other fields (Owner Email, Icon URL, Notes, etc.) can be left blank.
Keep the **Enforce Scopes** toggle turned **ON** (it's on by default).
Check the **Allow Include Parameters** checkbox. This lets Nectir AI surface additional course details (such as sub-account and instructor) in the course selector, making it easier to identify the right course when adding materials.
Check the **Read only** checkbox at the top of the scopes list. This grants read-only access to Canvas data, which is all Nectir AI needs.
The **Read only** option is the quickest way to configure scopes. Nectir AI only reads course data. It never modifies or deletes anything in Canvas.
 If your institution's security policy requires least-privilege access, you can select only the specific scopes Nectir AI needs instead of checking **Read only**. Enable each of the following scopes:
| Canvas Category | Scope | What Nectir Uses It For |
| ------------------------------- | ------------------------------------------------------------ | -------------------------------------------------- |
| **Courses** | `GET /api/v1/courses` | List the user's courses for the course selector |
| **Courses - Modules** | `GET /api/v1/courses/:course_id/modules` | Fetch course module structure for import |
| **Courses - Modules** | `GET /api/v1/courses/:course_id/modules/:module_id/items` | Fetch items within a module for import |
| **Courses - Files** | `GET /api/v1/courses/:course_id/files` | List course files for import |
| **Courses - Pages** | `GET /api/v1/courses/:course_id/pages` | List wiki pages for import |
| **Courses - Pages** | `GET /api/v1/courses/:course_id/pages/:url_or_id` | Fetch a page's full content for import |
| **Courses - Assignments** | `GET /api/v1/courses/:course_id/assignments` | List assignments for import |
| **Courses - Assignments** | `GET /api/v1/courses/:course_id/assignments/:id` | Fetch an assignment's full content for import |
| **Courses - Discussion Topics** | `GET /api/v1/courses/:course_id/discussion_topics` | List discussion topics for import |
| **Courses - Discussion Topics** | `GET /api/v1/courses/:course_id/discussion_topics/:topic_id` | Fetch a discussion topic's full content for import |
| **Courses - Quizzes** | `GET /api/v1/courses/:course_id/quizzes` | List quizzes for import |
| **Courses - Quizzes** | `GET /api/v1/courses/:course_id/quizzes/:id` | Fetch a quiz's details for import |
| **Courses - Quizzes** | `GET /api/v1/courses/:course_id/quizzes/:quiz_id/questions` | Fetch quiz questions for import |
| **Files** | `GET /api/v1/files/:id` | Fetch file metadata and download URL for import |
| **Files** | `GET /api/v1/files/:id/public_url` | Refresh expiring download URLs for ongoing sync |
All scopes are read-only (GET), and all operate at the course level. Nectir AI requests no account- or admin-level scopes, so the key only ever reaches courses the authorizing account is enrolled in. Nectir AI never creates, modifies, or deletes any data in Canvas.
Click **Save** at the bottom right of the Key Settings form. Canvas creates the key and reveals the **Client Secret** one time only.
Copy the **Client Secret** that Canvas displays after saving, switch to your Nectir AI tab, and paste it into the **API key Client Secret** field right away.
If your institution's security policy requires least-privilege access, you can select only the specific scopes Nectir AI needs instead of checking **Read only**. Enable each of the following scopes:
| Canvas Category | Scope | What Nectir Uses It For |
| ------------------------------- | ------------------------------------------------------------ | -------------------------------------------------- |
| **Courses** | `GET /api/v1/courses` | List the user's courses for the course selector |
| **Courses - Modules** | `GET /api/v1/courses/:course_id/modules` | Fetch course module structure for import |
| **Courses - Modules** | `GET /api/v1/courses/:course_id/modules/:module_id/items` | Fetch items within a module for import |
| **Courses - Files** | `GET /api/v1/courses/:course_id/files` | List course files for import |
| **Courses - Pages** | `GET /api/v1/courses/:course_id/pages` | List wiki pages for import |
| **Courses - Pages** | `GET /api/v1/courses/:course_id/pages/:url_or_id` | Fetch a page's full content for import |
| **Courses - Assignments** | `GET /api/v1/courses/:course_id/assignments` | List assignments for import |
| **Courses - Assignments** | `GET /api/v1/courses/:course_id/assignments/:id` | Fetch an assignment's full content for import |
| **Courses - Discussion Topics** | `GET /api/v1/courses/:course_id/discussion_topics` | List discussion topics for import |
| **Courses - Discussion Topics** | `GET /api/v1/courses/:course_id/discussion_topics/:topic_id` | Fetch a discussion topic's full content for import |
| **Courses - Quizzes** | `GET /api/v1/courses/:course_id/quizzes` | List quizzes for import |
| **Courses - Quizzes** | `GET /api/v1/courses/:course_id/quizzes/:id` | Fetch a quiz's details for import |
| **Courses - Quizzes** | `GET /api/v1/courses/:course_id/quizzes/:quiz_id/questions` | Fetch quiz questions for import |
| **Files** | `GET /api/v1/files/:id` | Fetch file metadata and download URL for import |
| **Files** | `GET /api/v1/files/:id/public_url` | Refresh expiring download URLs for ongoing sync |
All scopes are read-only (GET), and all operate at the course level. Nectir AI requests no account- or admin-level scopes, so the key only ever reaches courses the authorizing account is enrolled in. Nectir AI never creates, modifies, or deletes any data in Canvas.
Click **Save** at the bottom right of the Key Settings form. Canvas creates the key and reveals the **Client Secret** one time only.
Copy the **Client Secret** that Canvas displays after saving, switch to your Nectir AI tab, and paste it into the **API key Client Secret** field right away.
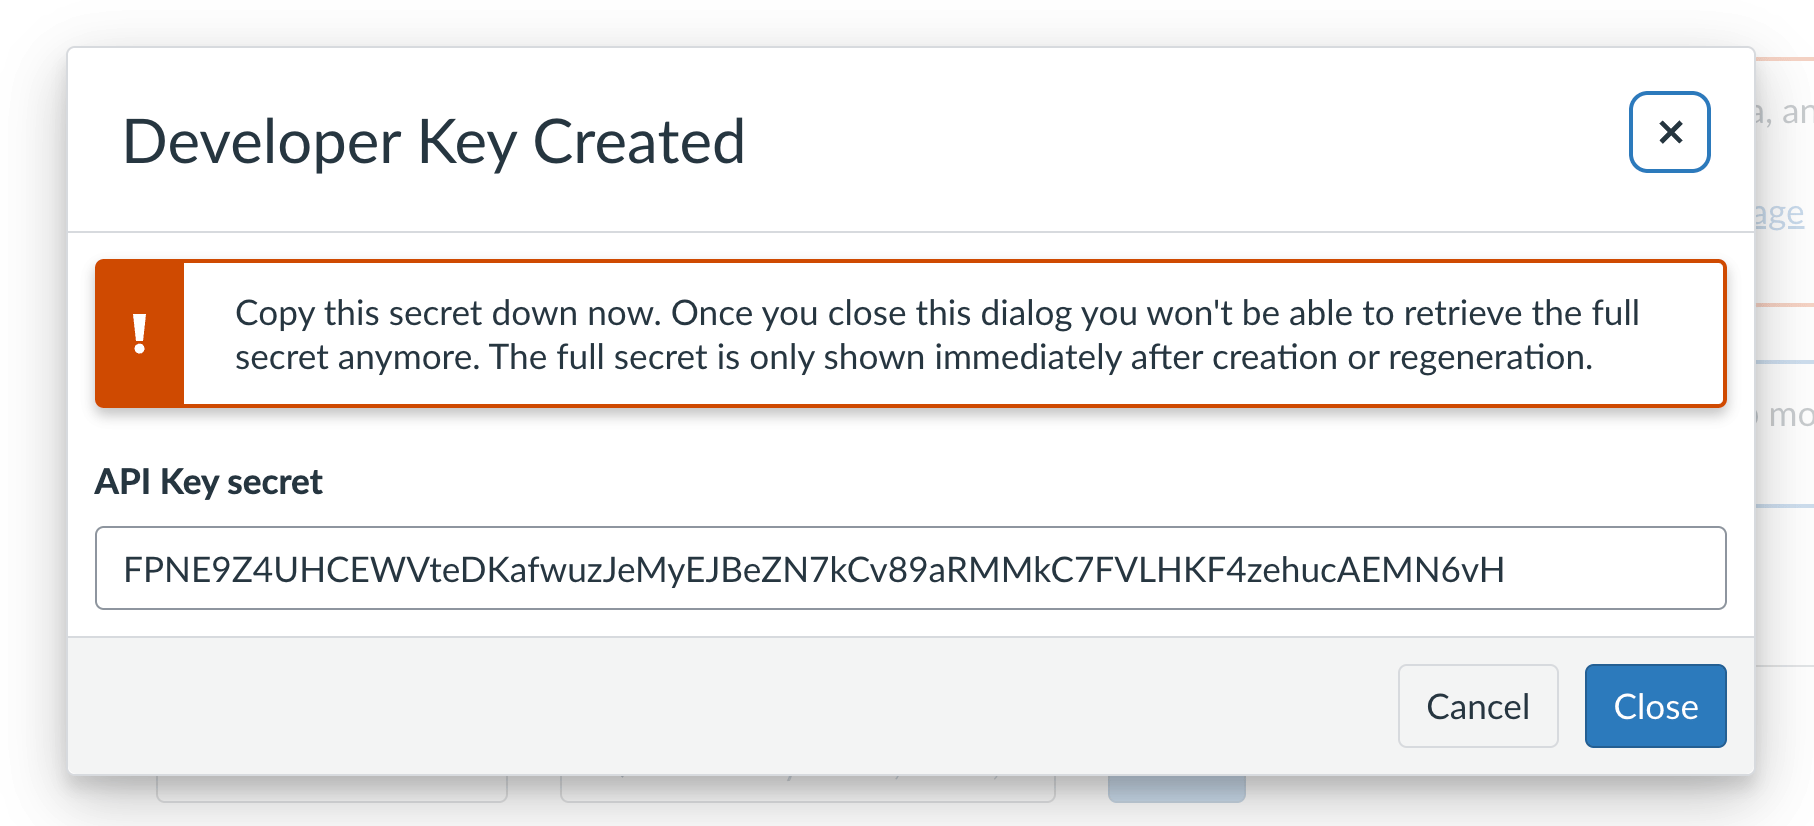 Don't close the **Developer Key Created** dialog before copying the secret. Canvas shows the full secret only once, and the only way to recover from a lost secret is to [rotate the credentials](/lms-integrations/canvas-lti-rotate-credentials).
Back in Canvas, find the **Client ID**, the number shown under the **Details** column in the Developer Keys listing. Copy it, switch to your Nectir AI tab, and paste it into the **API key Client ID** field.
Don't close the **Developer Key Created** dialog before copying the secret. Canvas shows the full secret only once, and the only way to recover from a lost secret is to [rotate the credentials](/lms-integrations/canvas-lti-rotate-credentials).
Back in Canvas, find the **Client ID**, the number shown under the **Details** column in the Developer Keys listing. Copy it, switch to your Nectir AI tab, and paste it into the **API key Client ID** field.
 Back on the Developer Keys listing, find your new key and click the toggle in the **State** column to turn it **ON** (green). The key must be enabled for the connection to succeed.
## Part 3: Complete the Connection in Nectir AI
Switch back to your Nectir AI tab, where the Client ID and Client Secret are already filled in. In the **Canvas instance URL** field, enter your Canvas URL (e.g., `https://yourschool.instructure.com`).
Back on the Developer Keys listing, find your new key and click the toggle in the **State** column to turn it **ON** (green). The key must be enabled for the connection to succeed.
## Part 3: Complete the Connection in Nectir AI
Switch back to your Nectir AI tab, where the Client ID and Client Secret are already filled in. In the **Canvas instance URL** field, enter your Canvas URL (e.g., `https://yourschool.instructure.com`).
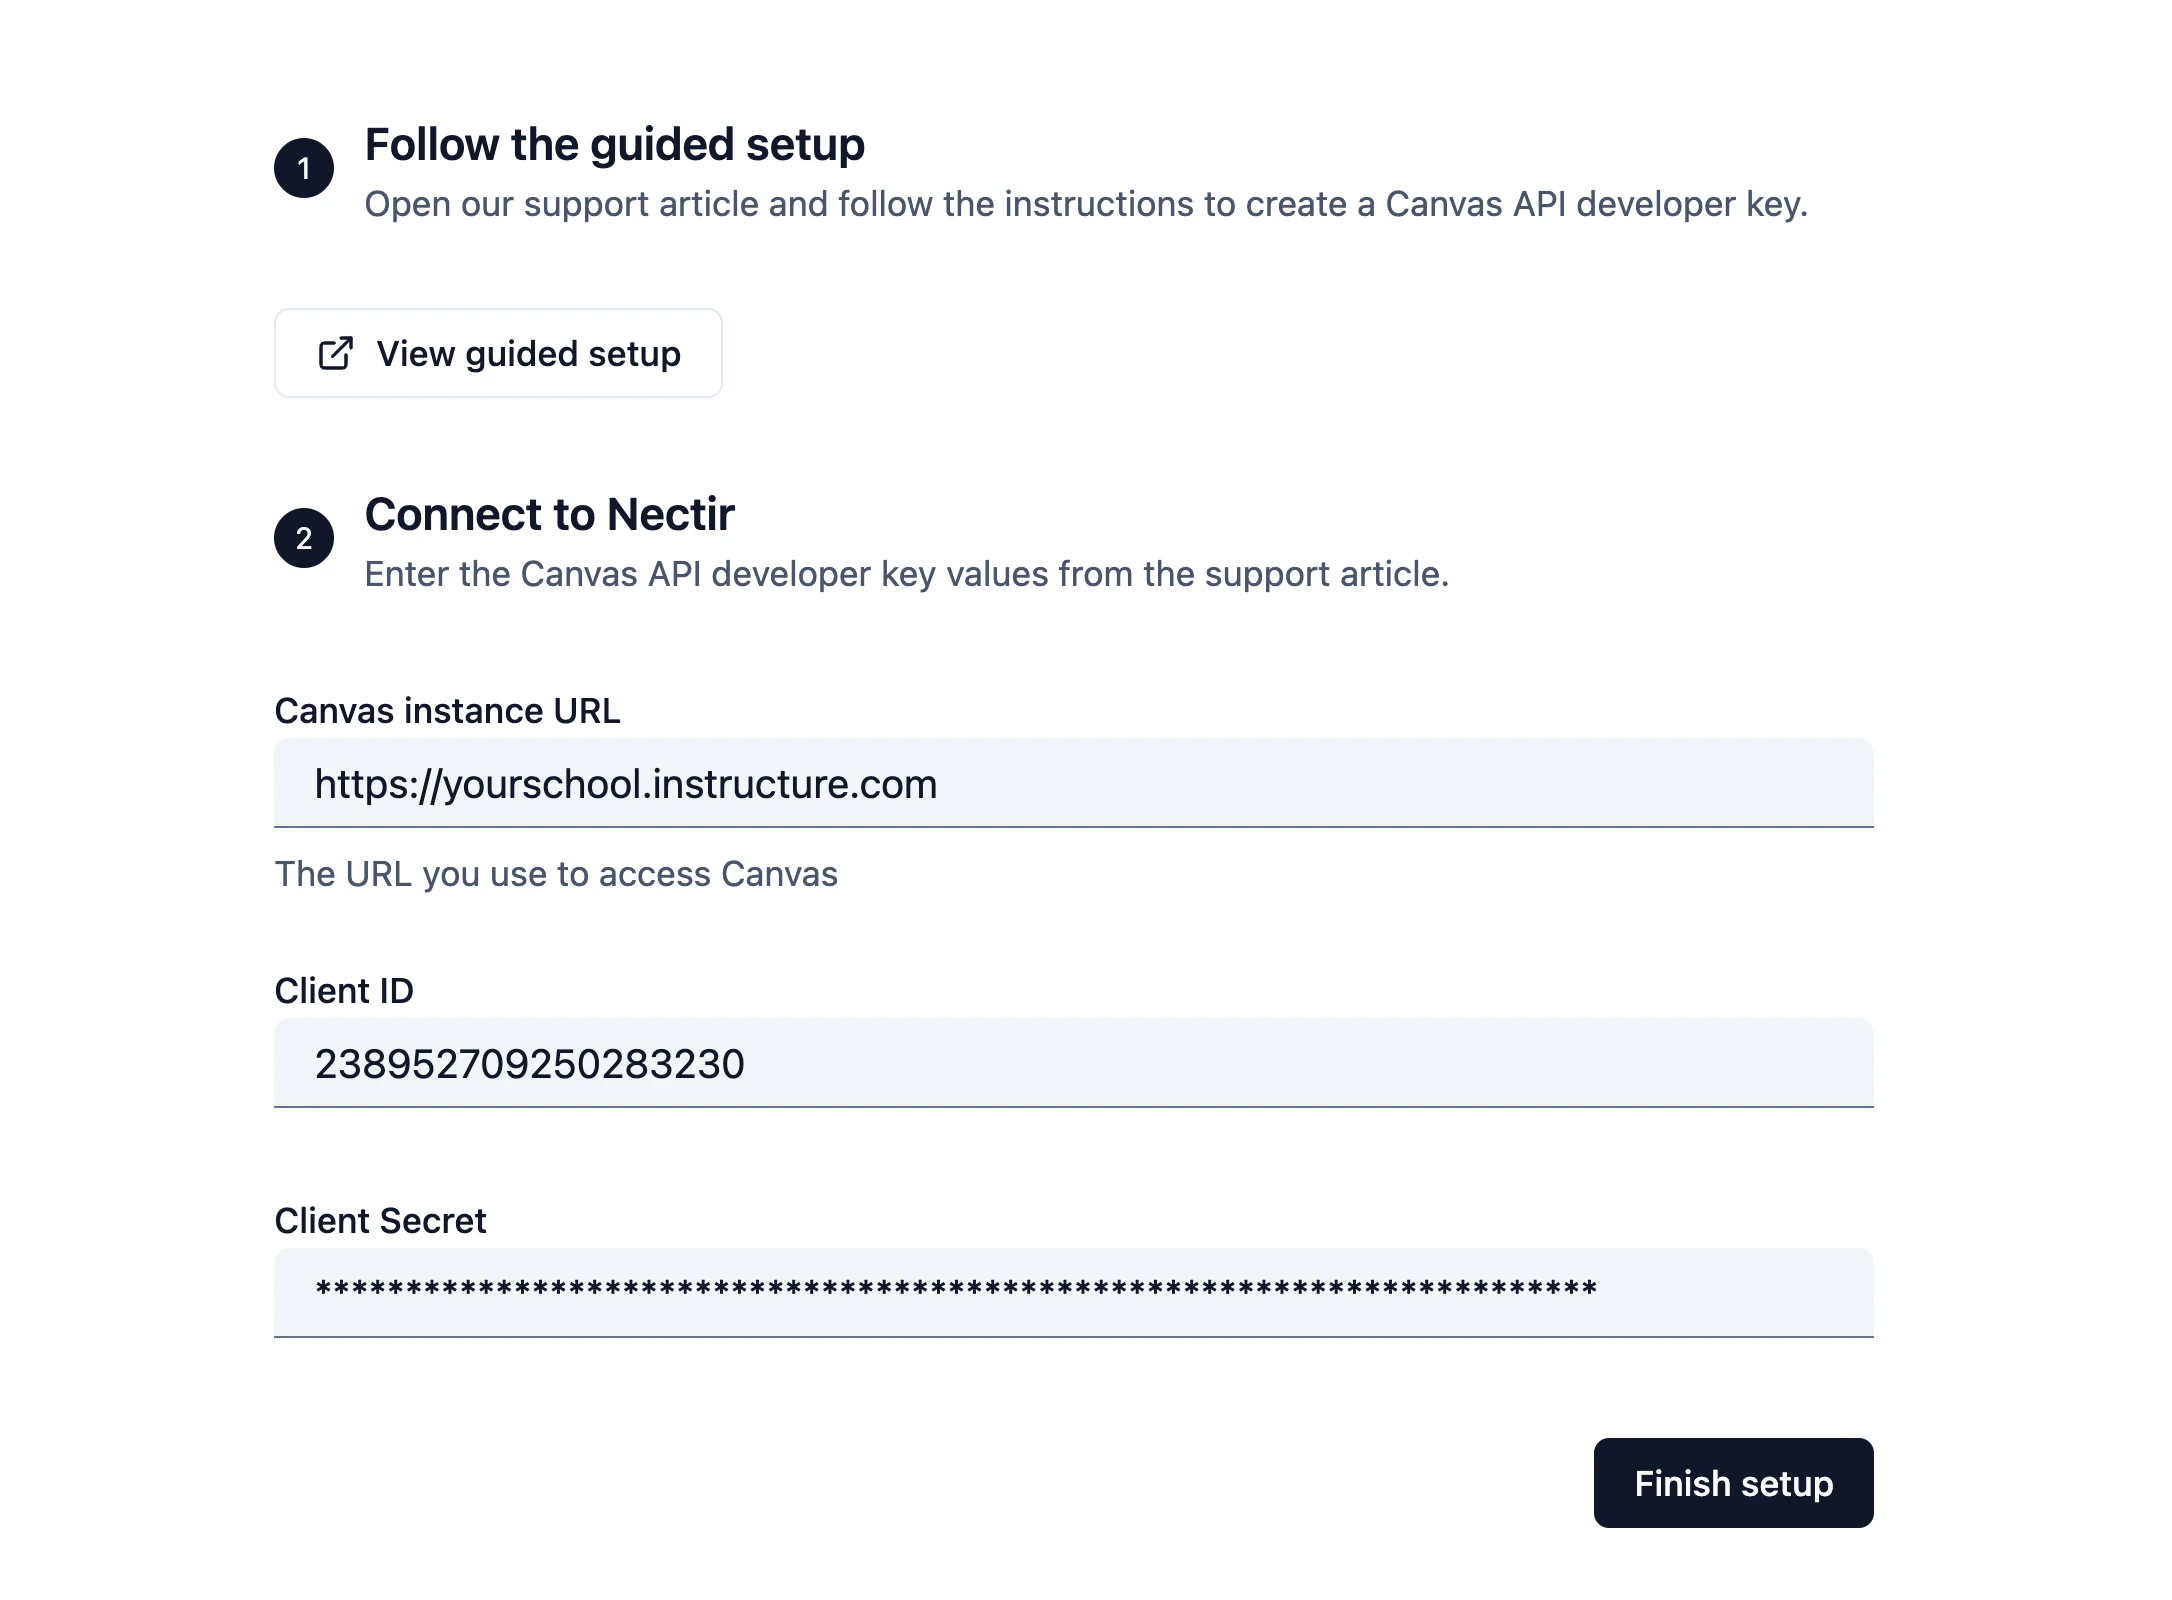 Click **Save and test connection**. Nectir AI redirects you to a Canvas OAuth authorization screen.
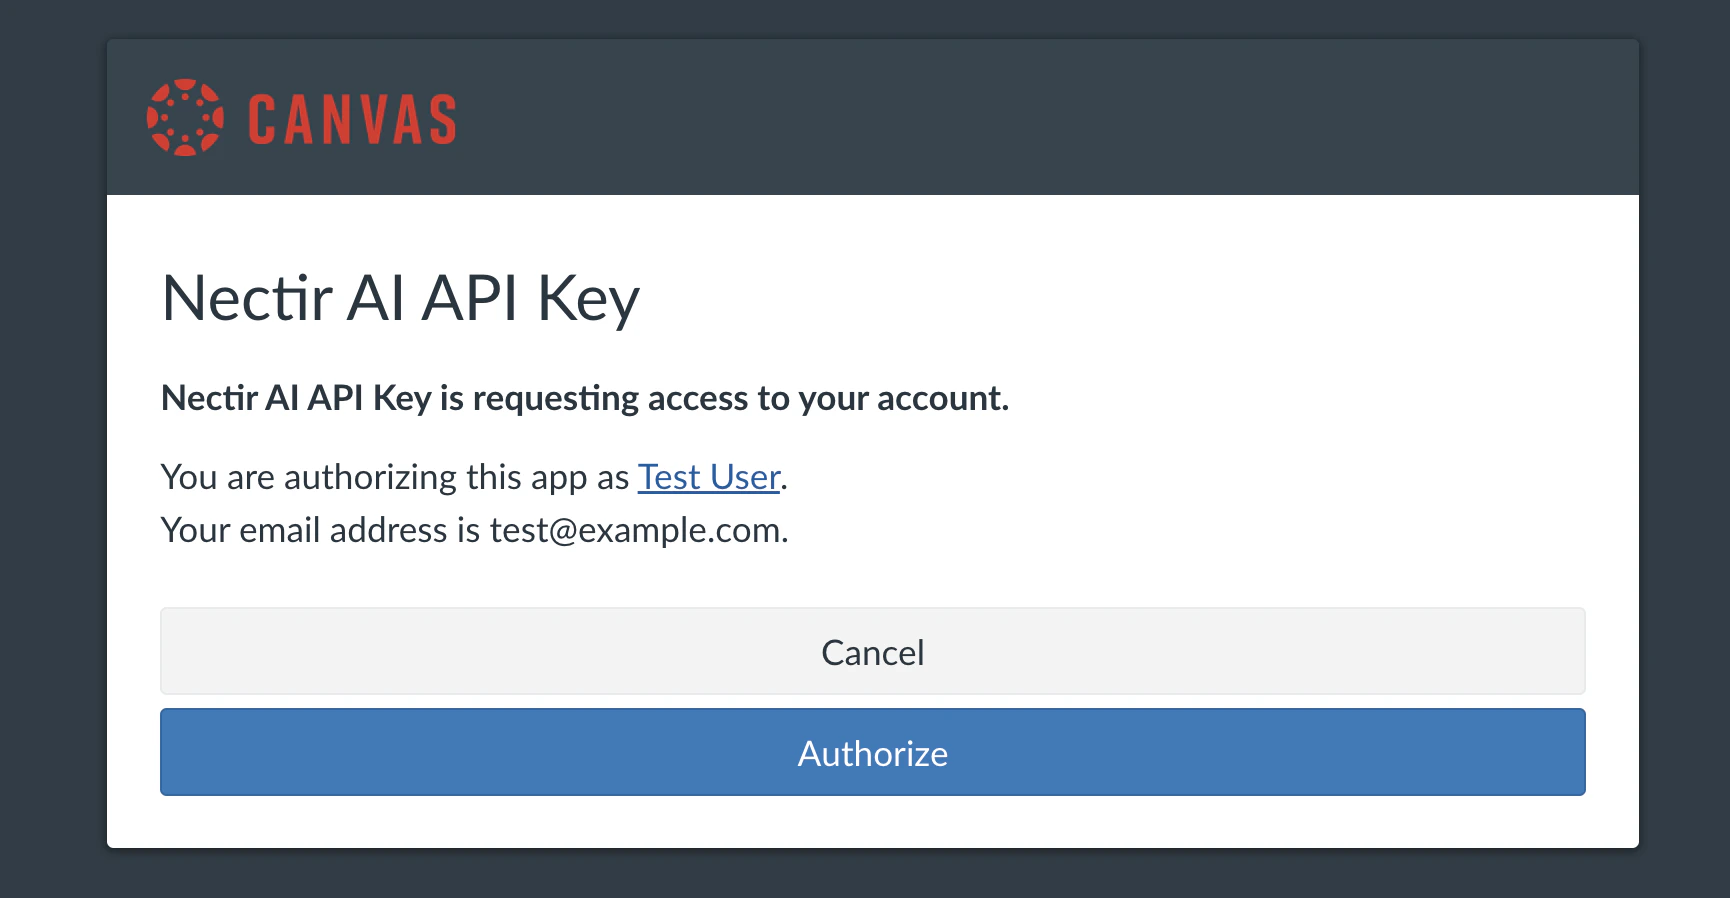 Click **Authorize** to grant Nectir AI read-only access to your Canvas data. Canvas returns you to Nectir AI automatically.
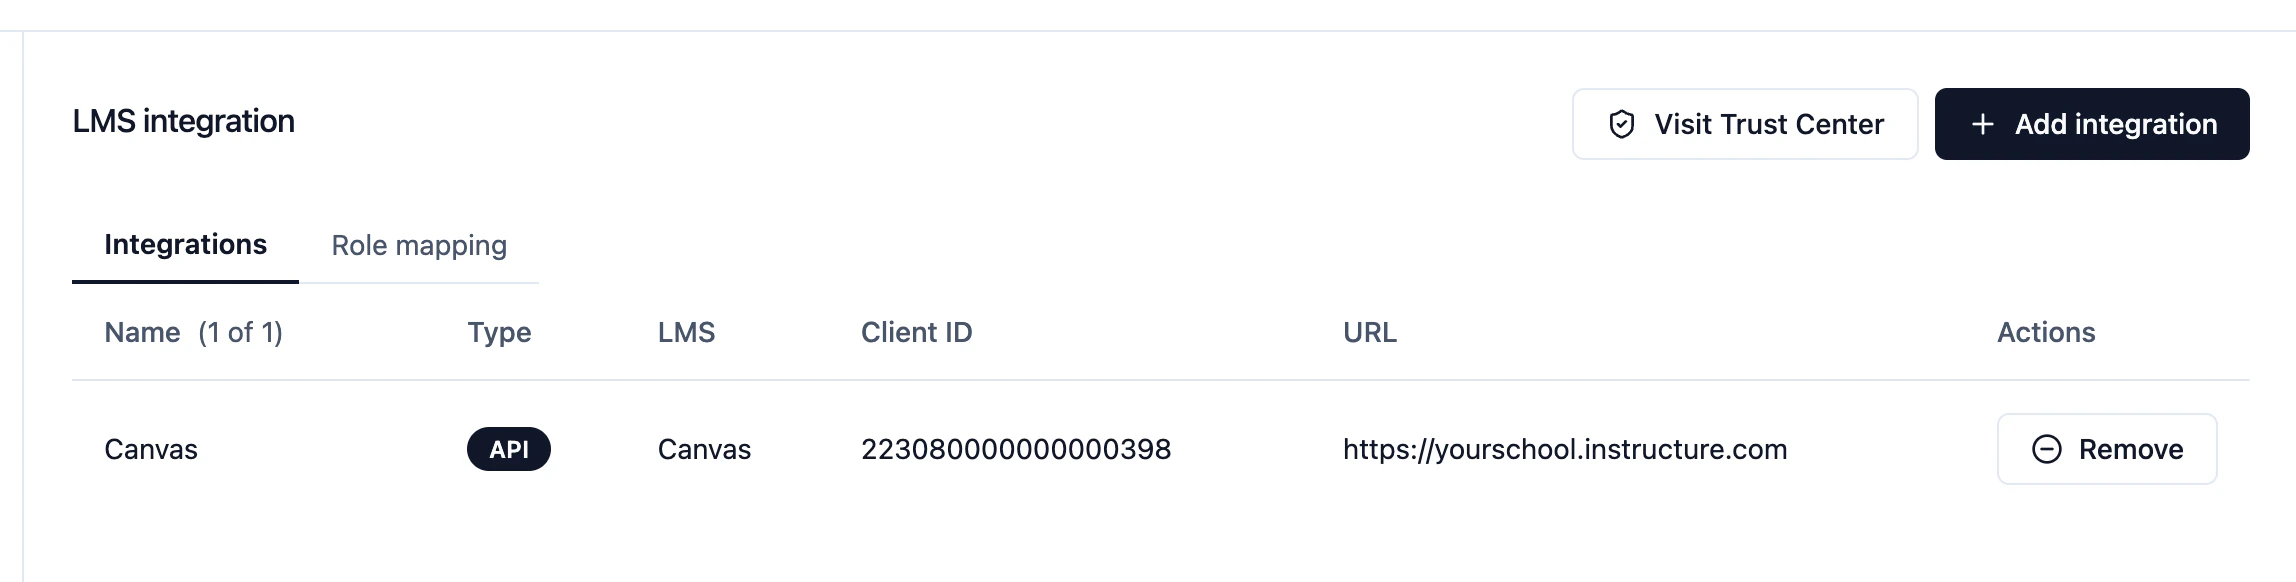 Your Canvas API integration is now active. Users can now import their Canvas course into their Assistant's knowledge base automatically.
## Verify the Integration
The API integration is working when instructors can browse Canvas course content from an Assistant. The quickest way to confirm this is to open an Assistant's **Knowledge** tab and check that the **Add from Canvas** option appears.
Most institutions that set up the API integration also run the Nectir AI LTI integration, so you can verify in the course context your instructors actually use.
Launch Nectir AI from a Canvas course that already has the [Nectir AI LTI integration](/lms-integrations/canvas-lti-guided) enabled. If you don't have one handy, use a test course: go to the course's **Settings** > **Navigation** tab, enable **Nectir AI**, save, then click **Nectir AI** in the course navigation to create or link a Group. See [Canvas Workspace Setup](/getting-started/workspace-setup-canvas) for the full linking flow.
You can also open an Assistant directly in Nectir AI without launching from Canvas. The LTI launch simply mirrors the instructor's real workflow.
Hover over your Assistant, click the **three dots**, select **Settings**, then navigate to the **Knowledge** tab.
Click **+ Add knowledge** and confirm that **Add from Canvas** appears as an option.
Your Canvas API integration is now active. Users can now import their Canvas course into their Assistant's knowledge base automatically.
## Verify the Integration
The API integration is working when instructors can browse Canvas course content from an Assistant. The quickest way to confirm this is to open an Assistant's **Knowledge** tab and check that the **Add from Canvas** option appears.
Most institutions that set up the API integration also run the Nectir AI LTI integration, so you can verify in the course context your instructors actually use.
Launch Nectir AI from a Canvas course that already has the [Nectir AI LTI integration](/lms-integrations/canvas-lti-guided) enabled. If you don't have one handy, use a test course: go to the course's **Settings** > **Navigation** tab, enable **Nectir AI**, save, then click **Nectir AI** in the course navigation to create or link a Group. See [Canvas Workspace Setup](/getting-started/workspace-setup-canvas) for the full linking flow.
You can also open an Assistant directly in Nectir AI without launching from Canvas. The LTI launch simply mirrors the instructor's real workflow.
Hover over your Assistant, click the **three dots**, select **Settings**, then navigate to the **Knowledge** tab.
Click **+ Add knowledge** and confirm that **Add from Canvas** appears as an option.
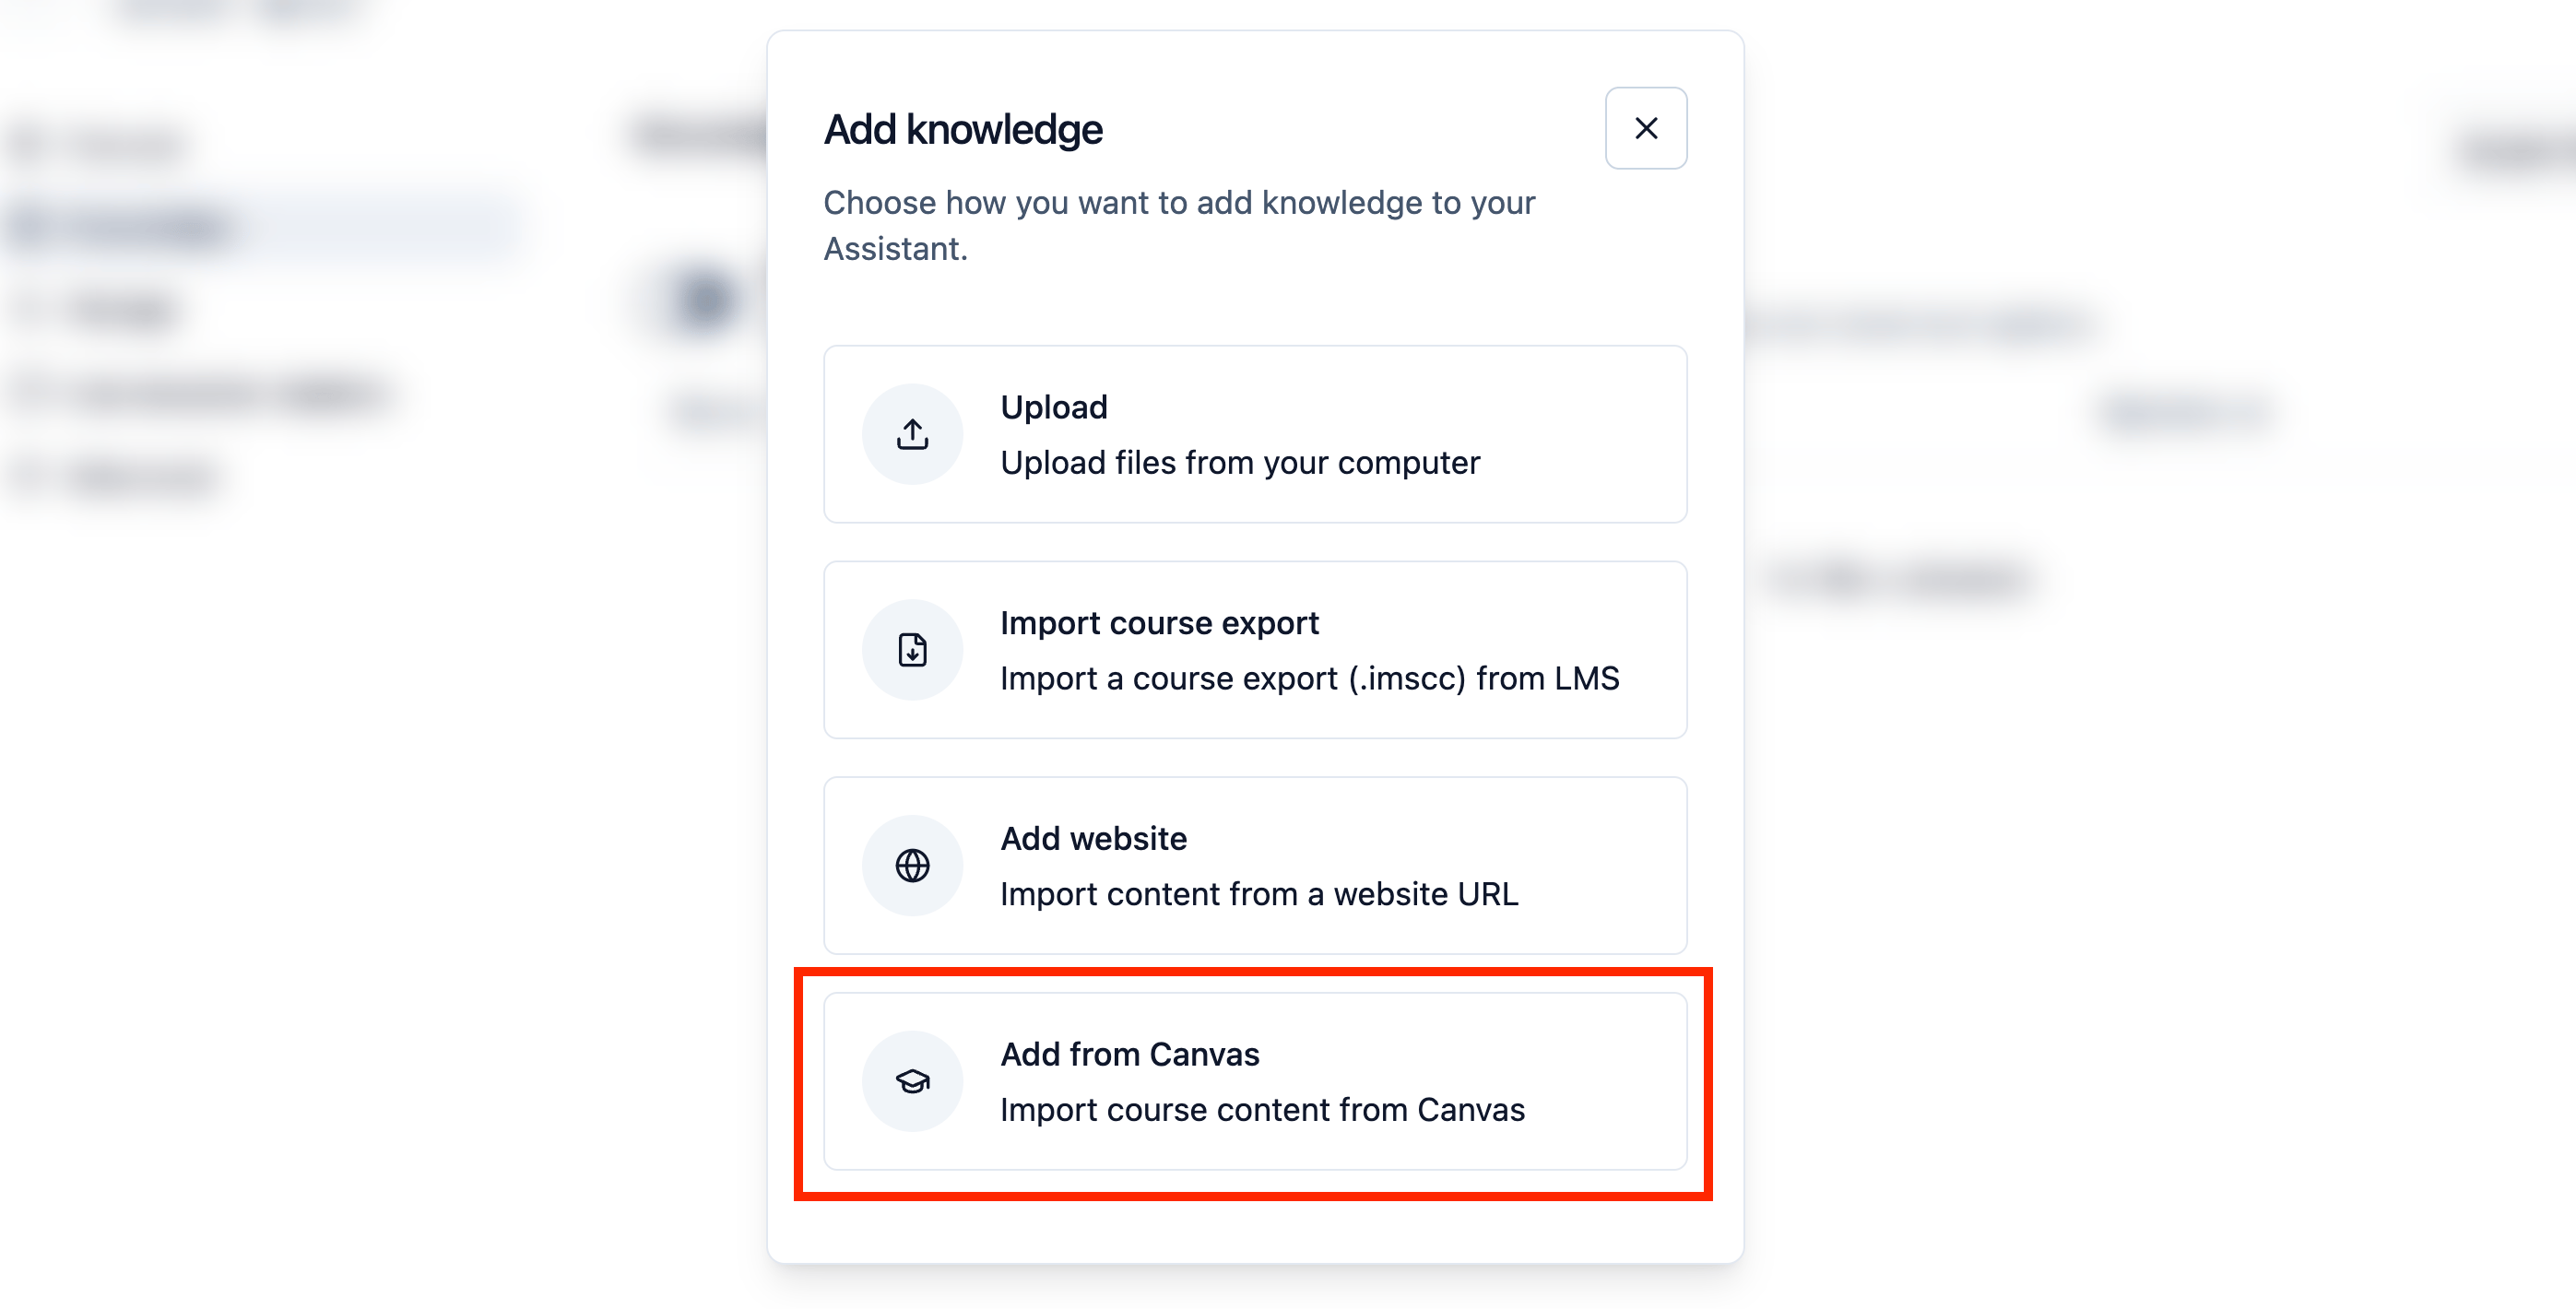 If **Add from Canvas** is listed, your API integration is live. See [Add from Canvas](/creating/canvas-import) for the full import workflow.
If the option is missing, see the troubleshooting note below.
## Troubleshooting
* Verify your Canvas URL is correct and includes `https://` (e.g., `https://yourschool.instructure.com`)
* Confirm the Client ID and Client Secret are copied exactly with no extra spaces
* Check that the API key is enabled (green toggle) in Canvas Developer Keys
* Confirm Part 3 finished successfully and the connection shows as active in **Workspace settings** > **LMS integration**
* Make sure the API key is enabled (green toggle) in Canvas
* The Assistant must belong to the Workspace where the API integration was configured
Ensure the Redirect URI in your Canvas API key is exactly:
```
https://ai.nectir.io/api/canvas/oauth/callback
```
Check for trailing spaces, missing characters, or incorrect protocol (`http` vs `https`).
Verify that all required scopes are enabled on your API key in Canvas. Either the **Read only** checkbox should be checked, or the individual scopes listed in [Configure API Scopes](#configure-api-scopes) should be enabled.
The Client Secret is shown only once, when you save the key. If you didn't copy it in time, follow the [credential rotation guide](/lms-integrations/canvas-lti-rotate-credentials) to generate a new secret, then re-enter it in Nectir AI.
The Developer Keys page is only available to Canvas administrators at the account level. If you don't see it in the Admin sidebar, contact your institution's Canvas administrator to request access or have them create the key for you.
For additional help, contact [support@nectir.io](mailto:support@nectir.io).
## Next Steps
Learn how to browse and import Canvas course content into your Assistant's knowledge base
Set up the LTI integration to embed Nectir AI directly inside Canvas courses
If **Add from Canvas** is listed, your API integration is live. See [Add from Canvas](/creating/canvas-import) for the full import workflow.
If the option is missing, see the troubleshooting note below.
## Troubleshooting
* Verify your Canvas URL is correct and includes `https://` (e.g., `https://yourschool.instructure.com`)
* Confirm the Client ID and Client Secret are copied exactly with no extra spaces
* Check that the API key is enabled (green toggle) in Canvas Developer Keys
* Confirm Part 3 finished successfully and the connection shows as active in **Workspace settings** > **LMS integration**
* Make sure the API key is enabled (green toggle) in Canvas
* The Assistant must belong to the Workspace where the API integration was configured
Ensure the Redirect URI in your Canvas API key is exactly:
```
https://ai.nectir.io/api/canvas/oauth/callback
```
Check for trailing spaces, missing characters, or incorrect protocol (`http` vs `https`).
Verify that all required scopes are enabled on your API key in Canvas. Either the **Read only** checkbox should be checked, or the individual scopes listed in [Configure API Scopes](#configure-api-scopes) should be enabled.
The Client Secret is shown only once, when you save the key. If you didn't copy it in time, follow the [credential rotation guide](/lms-integrations/canvas-lti-rotate-credentials) to generate a new secret, then re-enter it in Nectir AI.
The Developer Keys page is only available to Canvas administrators at the account level. If you don't see it in the Admin sidebar, contact your institution's Canvas administrator to request access or have them create the key for you.
For additional help, contact [support@nectir.io](mailto:support@nectir.io).
## Next Steps
Learn how to browse and import Canvas course content into your Assistant's knowledge base
Set up the LTI integration to embed Nectir AI directly inside Canvas courses