> ## Documentation Index
> Fetch the complete documentation index at: https://support.nectir.io/llms.txt
> Use this file to discover all available pages before exploring further.
# Rotate Your Canvas LTI Client ID
> Replace your Nectir AI Canvas LTI Client ID without breaking your course-to-Group connections.
This guide is intended for LMS administrators. If you encounter any issues during the integration process, please contact [support@nectir.io](mailto:support@nectir.io).
## Should You Rotate?
**May 2026 update**: Some customers are asking about this procedure in response to the [May 2026 Instructure security incident](https://www.instructure.com/incident_update). There is no indication that LTI 1.3 applications like Nectir AI were affected, and rotation is not required by Instructure. If your institution's security policy requires rotation out of an abundance of caution, the steps below show you how to do it safely.
You might want to rotate your Canvas LTI Client ID if:
* Your institution's security policy requires rotating credentials for connected platforms after a partner discloses an incident
* You suspect your Canvas-side configuration may have been exposed
* You're following a routine credential-rotation schedule
LTI 1.3 uses public-key cryptography and per-launch signed tokens rather than long-lived shared secrets, so a Client ID on its own isn't a credential that can be replayed against your Nectir AI integration. Rotation rarely helps as an emergency response, and **Nectir doesn't necessarily recommend it**. This article documents a safe, reversible procedure for the cases where you do choose to rotate.
## How This Procedure Works
This procedure rotates the Canvas-side Client ID while preserving your existing Nectir AI LTI integration record. Course-to-Group links, role mapping, and Workspace settings stay intact because you **edit** the existing Nectir integration to use a new Client ID rather than deleting and recreating it.
## Before You Begin
Do not delete your existing Canvas LTI integration in Nectir AI. Doing so will break every course-to-Group link in your Workspace. This procedure replaces only the Canvas-side app and updates the Client ID on your existing Nectir integration.
You'll need:
* **Canvas admin access** at the same account level where Nectir AI is currently installed
* **Nectir AI Workspace admin access** (Owner or Editor)
* Two browser tabs open: Canvas and Nectir AI Workspace settings
* Roughly 15 minutes. Nectir AI will be hidden from courses for a short window during the rotation, but no data or links are lost.
## Rotation Procedure
In Canvas, navigate to **Admin** > **Apps** > **Manage** and select your existing Nectir AI app. Record the following so you can recreate them on the new app in step 4:
* **Nickname** (if you set one)
* **Root account availability** (Available or Not Available)
* **Availability Exceptions** for any sub-accounts
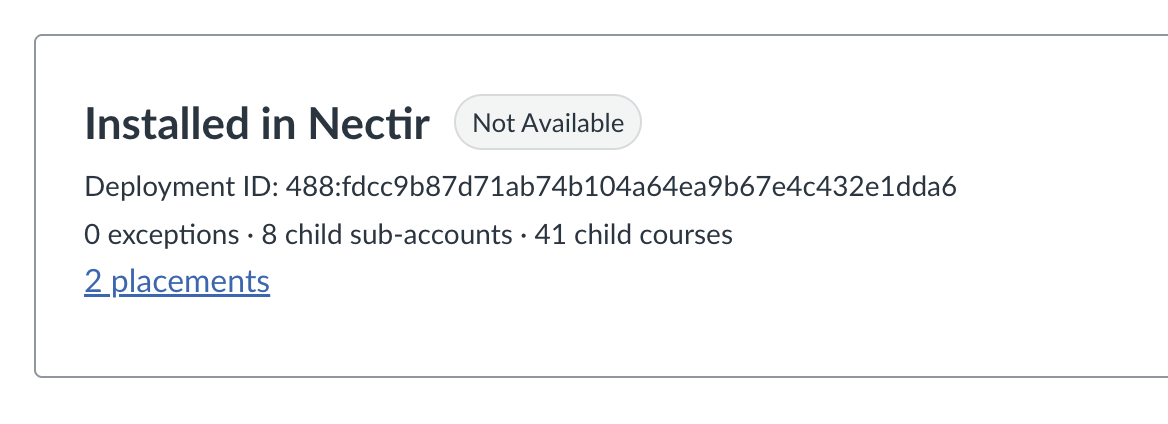 District admins using sub-account scoping should screenshot the full Exceptions list before continuing, so nothing is missed when mirroring settings on the new app.
Still on the existing Nectir AI app, go to the **Availability and Exceptions** tab. Click the pencil icon next to the root account (or next to each Exception) and change the setting from **Available** to **Not Available**, then **Save**.
District admins using sub-account scoping should screenshot the full Exceptions list before continuing, so nothing is missed when mirroring settings on the new app.
Still on the existing Nectir AI app, go to the **Availability and Exceptions** tab. Click the pencil icon next to the root account (or next to each Exception) and change the setting from **Available** to **Not Available**, then **Save**.
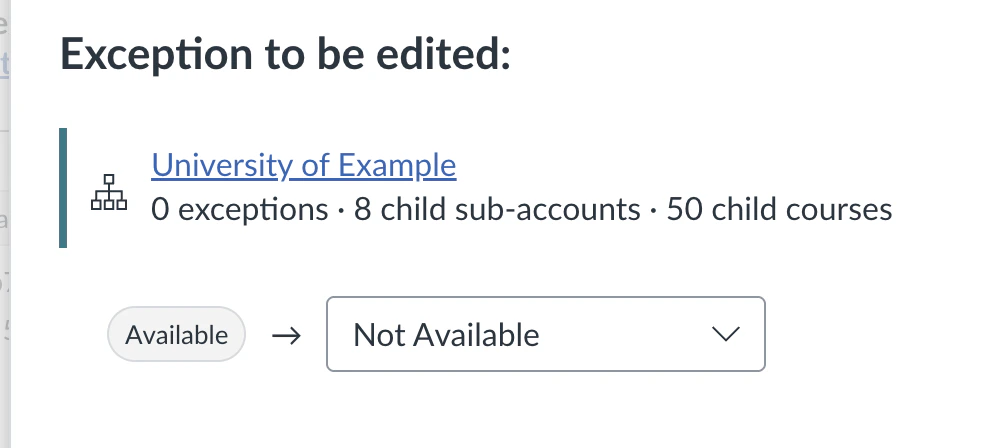 This hides Nectir AI from courses without deleting the app. The rotation remains fully reversible at this point. Do not delete the app yet.
1. In Nectir AI, navigate to **Workspace settings** > **LMS integration** > **Add integration** > **Canvas** > **LTI integration**
2. Copy the JSON shown on that screen
3. **Cancel** the flow before saving by clicking the **X** in the top left corner. You are only using this screen to grab the JSON. Do not finish creating a new integration on the Nectir side.
Your existing Nectir integration must stay in place. If you accidentally complete the Add integration flow and create a second Canvas LTI integration in Nectir AI, delete that new integration. Never delete your original. It holds every course-to-Group link in your Workspace.
Then install the new app in Canvas. Follow only the **Install the App in Canvas** and **Enable the App in Canvas** sections of the [LTI Guided Setup](/lms-integrations/canvas-lti-guided#install-the-app-in-canvas) using the JSON you just copied. Do not continue into the "Complete the Connection in Nectir AI" section. Your existing Nectir integration stays as-is and is updated in step 6.
1. In Canvas, go to **Admin** > **Apps** > **Manage**
2. Select **Install a New App**
3. In the **Install Method** dropdown, select **JSON**
4. Paste the JSON you copied from Nectir AI
5. Select **Next** until you reach the **Nickname** section, then set all three of the following to `Nectir AI (New)` so you and your users can tell the new app apart from the old one in course navigation during the rotation:
* **Administration Nickname** (at the top of the section)
* **Placement Names** > **Account Navigation** (scroll down)
* **Placement Names** > **Course Navigation**
6. Select **Install App**.
You'll rename all three of these fields back to `Nectir AI` in step 8 after deleting the old app.
District admins rotating multiple apps across multiple Nectir Workspaces (one per college) should copy the JSON from each Workspace separately and pair it with the matching Canvas app. Each Workspace's JSON contains its own Workspace ID.
On the new app's **Availability and Exceptions** tab, recreate the same root-account state and Exceptions you recorded in step 1. For most installs, this means clicking the pencil icon next to the root account and changing it from **Not Available** to **Available**.
This hides Nectir AI from courses without deleting the app. The rotation remains fully reversible at this point. Do not delete the app yet.
1. In Nectir AI, navigate to **Workspace settings** > **LMS integration** > **Add integration** > **Canvas** > **LTI integration**
2. Copy the JSON shown on that screen
3. **Cancel** the flow before saving by clicking the **X** in the top left corner. You are only using this screen to grab the JSON. Do not finish creating a new integration on the Nectir side.
Your existing Nectir integration must stay in place. If you accidentally complete the Add integration flow and create a second Canvas LTI integration in Nectir AI, delete that new integration. Never delete your original. It holds every course-to-Group link in your Workspace.
Then install the new app in Canvas. Follow only the **Install the App in Canvas** and **Enable the App in Canvas** sections of the [LTI Guided Setup](/lms-integrations/canvas-lti-guided#install-the-app-in-canvas) using the JSON you just copied. Do not continue into the "Complete the Connection in Nectir AI" section. Your existing Nectir integration stays as-is and is updated in step 6.
1. In Canvas, go to **Admin** > **Apps** > **Manage**
2. Select **Install a New App**
3. In the **Install Method** dropdown, select **JSON**
4. Paste the JSON you copied from Nectir AI
5. Select **Next** until you reach the **Nickname** section, then set all three of the following to `Nectir AI (New)` so you and your users can tell the new app apart from the old one in course navigation during the rotation:
* **Administration Nickname** (at the top of the section)
* **Placement Names** > **Account Navigation** (scroll down)
* **Placement Names** > **Course Navigation**
6. Select **Install App**.
You'll rename all three of these fields back to `Nectir AI` in step 8 after deleting the old app.
District admins rotating multiple apps across multiple Nectir Workspaces (one per college) should copy the JSON from each Workspace separately and pair it with the matching Canvas app. Each Workspace's JSON contains its own Workspace ID.
On the new app's **Availability and Exceptions** tab, recreate the same root-account state and Exceptions you recorded in step 1. For most installs, this means clicking the pencil icon next to the root account and changing it from **Not Available** to **Available**.
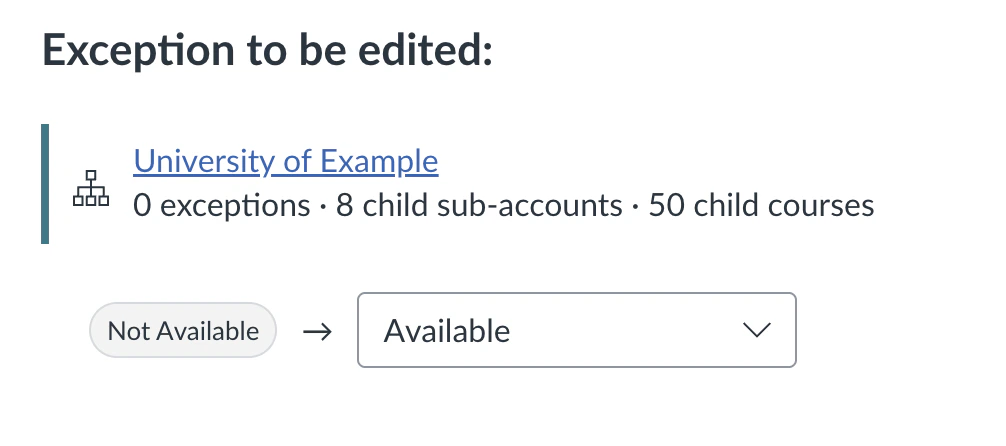 For district setups using sub-account scoping, set the root account to **Not Available** and add the same sub-account Exception(s) with **Available**. Select **Save** when done.
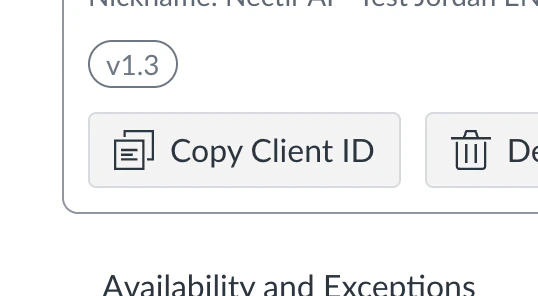
From the new app's details page, select **Copy Client ID**. You'll paste it into your existing Nectir AI integration in the next step.
For district setups using sub-account scoping, set the root account to **Not Available** and add the same sub-account Exception(s) with **Available**. Select **Save** when done.
From the new app's details page, select **Copy Client ID**. You'll paste it into your existing Nectir AI integration in the next step.
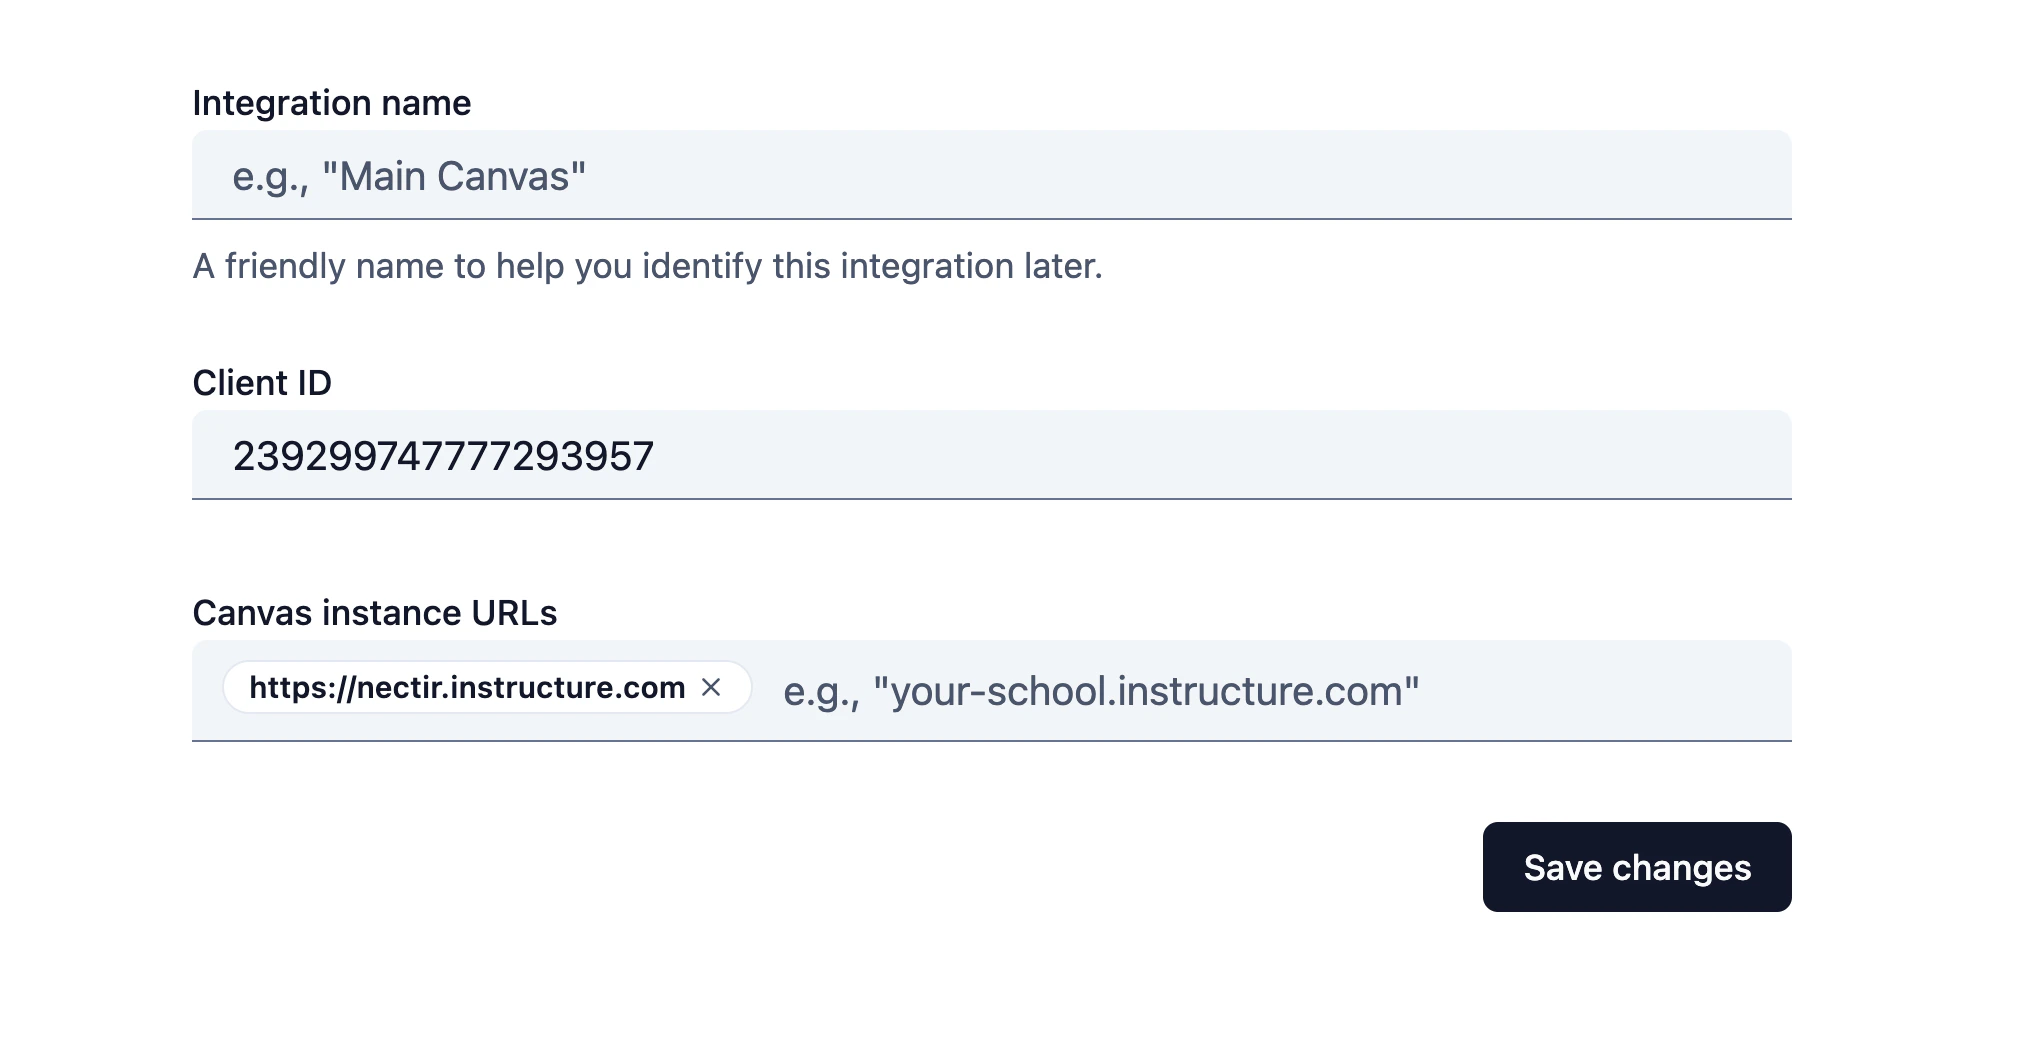
 In Nectir AI, navigate to **Workspace settings** > **LMS integration**. Find your existing Canvas LTI integration and select **Edit** (pencil icon).
Paste the new Client ID into the **Client ID** field. Leave **Integration name** and **Canvas instance URLs** unchanged. Select **Save changes**.
In Nectir AI, navigate to **Workspace settings** > **LMS integration**. Find your existing Canvas LTI integration and select **Edit** (pencil icon).
Paste the new Client ID into the **Client ID** field. Leave **Integration name** and **Canvas instance URLs** unchanged. Select **Save changes**.
 Open a Canvas course where your user has an enrollment (ideally as a Teacher). The new app is hidden by default in course navigation, so you'll need to enable it for the test course first:
1. In the course, go to **Settings** > **Navigation**
2. Find **Nectir AI (New)** in the hidden items section at the bottom and drag it into the visible items above
3. Select **Save**
4. From the course's left navigation, select **Nectir AI (New)**
Confirm that Nectir AI opens to the **same Group as before**, not a "link or create a Group" prompt.
If Nectir AI opens to the linked Group, the rotation succeeded. Your course-to-Group connections, role mappings, and Workspace settings are intact.
If **Nectir AI (New)** does not appear in the hidden items list, the new app is not enabled at the account level. Go back to step 4 and confirm the availability is set to **Available** for the right account or sub-account.
If you see a "link or create a Group" prompt or any other error, stop here and use the [recovery steps below](#if-something-goes-wrong) before continuing.
Only after step 7 validates successfully:
1. In Canvas, navigate to **Admin** > **Apps** > **Manage**
2. Open the **original** Nectir AI app (the one you disabled in step 2) and delete it
3. Open the **new** app and rename each of the following back to `Nectir AI`:
* **Administration Nickname**
* **Placement Names** > **Account Navigation**
* **Placement Names** > **Course Navigation**
4. Save your changes
Your Nectir AI integration continues to function on the new Client ID, and the app name in course navigation returns to `Nectir AI`.
## If Something Goes Wrong
If launches fail after step 6, you can revert without losing any data:
1. In Nectir AI, go to **Workspace settings** > **LMS integration**, edit your Canvas LTI integration, and paste the **old** Client ID back into the **Client ID** field. Save.
2. In Canvas, re-enable the original Nectir AI app's availability by reversing step 2 (set the root account or Exceptions back to **Available**).
3. Disable or delete the new app you installed in step 3.
4. Contact [support@nectir.io](mailto:support@nectir.io) with your Workspace name and the approximate time of the rotation attempt.
For general Canvas LTI symptoms after launch (login prompts, missing Assistant in course navigation, third-party cookie issues), see [Canvas Integration Issues](/troubleshooting/canvas-issues).
## Related Articles
The full first-time install guide for the Canvas LTI integration.
The dated log of post-setup configuration changes and notices for your integration.
Integration methods, security standards, and data access for IT review.
Troubleshooting for Canvas LTI launch and connection problems.
Open a Canvas course where your user has an enrollment (ideally as a Teacher). The new app is hidden by default in course navigation, so you'll need to enable it for the test course first:
1. In the course, go to **Settings** > **Navigation**
2. Find **Nectir AI (New)** in the hidden items section at the bottom and drag it into the visible items above
3. Select **Save**
4. From the course's left navigation, select **Nectir AI (New)**
Confirm that Nectir AI opens to the **same Group as before**, not a "link or create a Group" prompt.
If Nectir AI opens to the linked Group, the rotation succeeded. Your course-to-Group connections, role mappings, and Workspace settings are intact.
If **Nectir AI (New)** does not appear in the hidden items list, the new app is not enabled at the account level. Go back to step 4 and confirm the availability is set to **Available** for the right account or sub-account.
If you see a "link or create a Group" prompt or any other error, stop here and use the [recovery steps below](#if-something-goes-wrong) before continuing.
Only after step 7 validates successfully:
1. In Canvas, navigate to **Admin** > **Apps** > **Manage**
2. Open the **original** Nectir AI app (the one you disabled in step 2) and delete it
3. Open the **new** app and rename each of the following back to `Nectir AI`:
* **Administration Nickname**
* **Placement Names** > **Account Navigation**
* **Placement Names** > **Course Navigation**
4. Save your changes
Your Nectir AI integration continues to function on the new Client ID, and the app name in course navigation returns to `Nectir AI`.
## If Something Goes Wrong
If launches fail after step 6, you can revert without losing any data:
1. In Nectir AI, go to **Workspace settings** > **LMS integration**, edit your Canvas LTI integration, and paste the **old** Client ID back into the **Client ID** field. Save.
2. In Canvas, re-enable the original Nectir AI app's availability by reversing step 2 (set the root account or Exceptions back to **Available**).
3. Disable or delete the new app you installed in step 3.
4. Contact [support@nectir.io](mailto:support@nectir.io) with your Workspace name and the approximate time of the rotation attempt.
For general Canvas LTI symptoms after launch (login prompts, missing Assistant in course navigation, third-party cookie issues), see [Canvas Integration Issues](/troubleshooting/canvas-issues).
## Related Articles
The full first-time install guide for the Canvas LTI integration.
The dated log of post-setup configuration changes and notices for your integration.
Integration methods, security standards, and data access for IT review.
Troubleshooting for Canvas LTI launch and connection problems.