> ## Documentation Index
> Fetch the complete documentation index at: https://support.nectir.io/llms.txt
> Use this file to discover all available pages before exploring further.

# Introduce Nectir AI to Your Students

> Everything you need to introduce your AI Assistant to students, including LMS page templates, announcement tips, student FAQs, and engagement strategies

The moment students know Nectir exists, and understand *why* it's different, they use it more confidently all semester. Whether your institution uses Canvas, Moodle, or a direct link, the resources below work for all.

## What's Included

<CardGroup cols={2}>
  <Card title="LMS Course Page" icon="file-lines" href="#add-the-page-to-your-course">
    A customizable page template to introduce your Assistant to students
  </Card>

  <Card title="Introduction Tips" icon="lightbulb" href="#tips-for-introducing-nectir-well">
    Guidance for setting the right tone and keeping students engaged
  </Card>

  <Card title="Student FAQ" icon="circle-question" href="#common-student-questions">
    Ready-to-use answers for the questions students ask most
  </Card>

  <Card title="Faculty Guide" icon="book" href="#faculty-guide">
    The full AI Faculty Guide for deeper guidance
  </Card>
</CardGroup>

## What the Page Looks Like

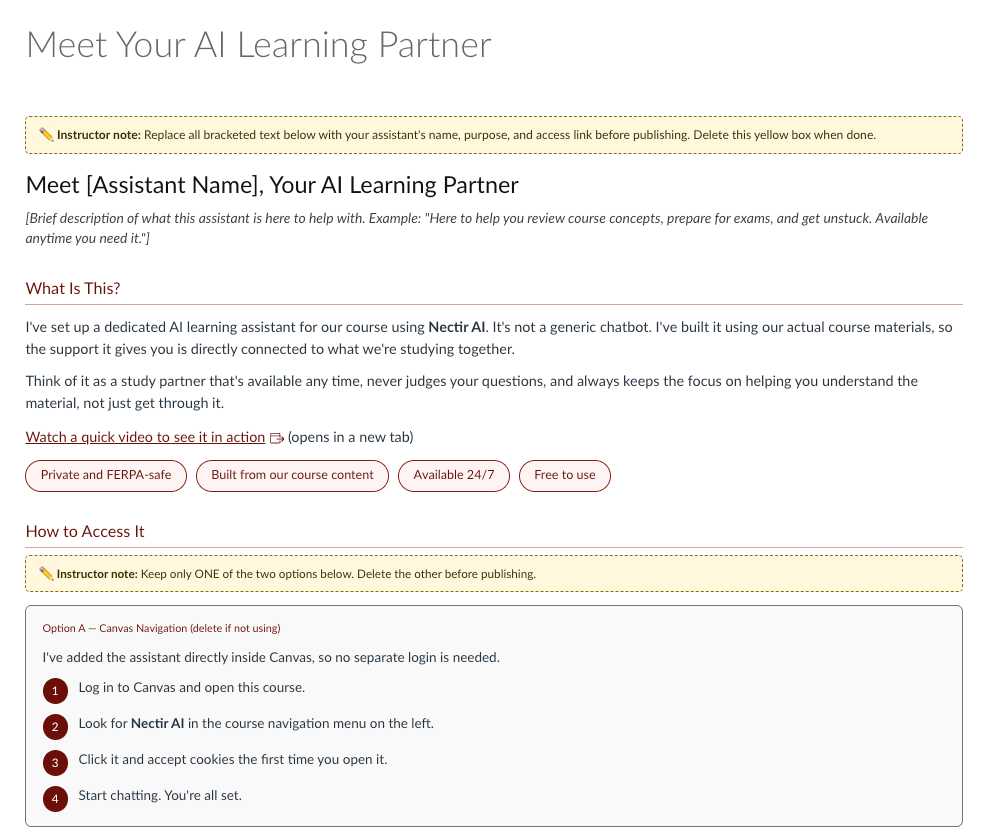
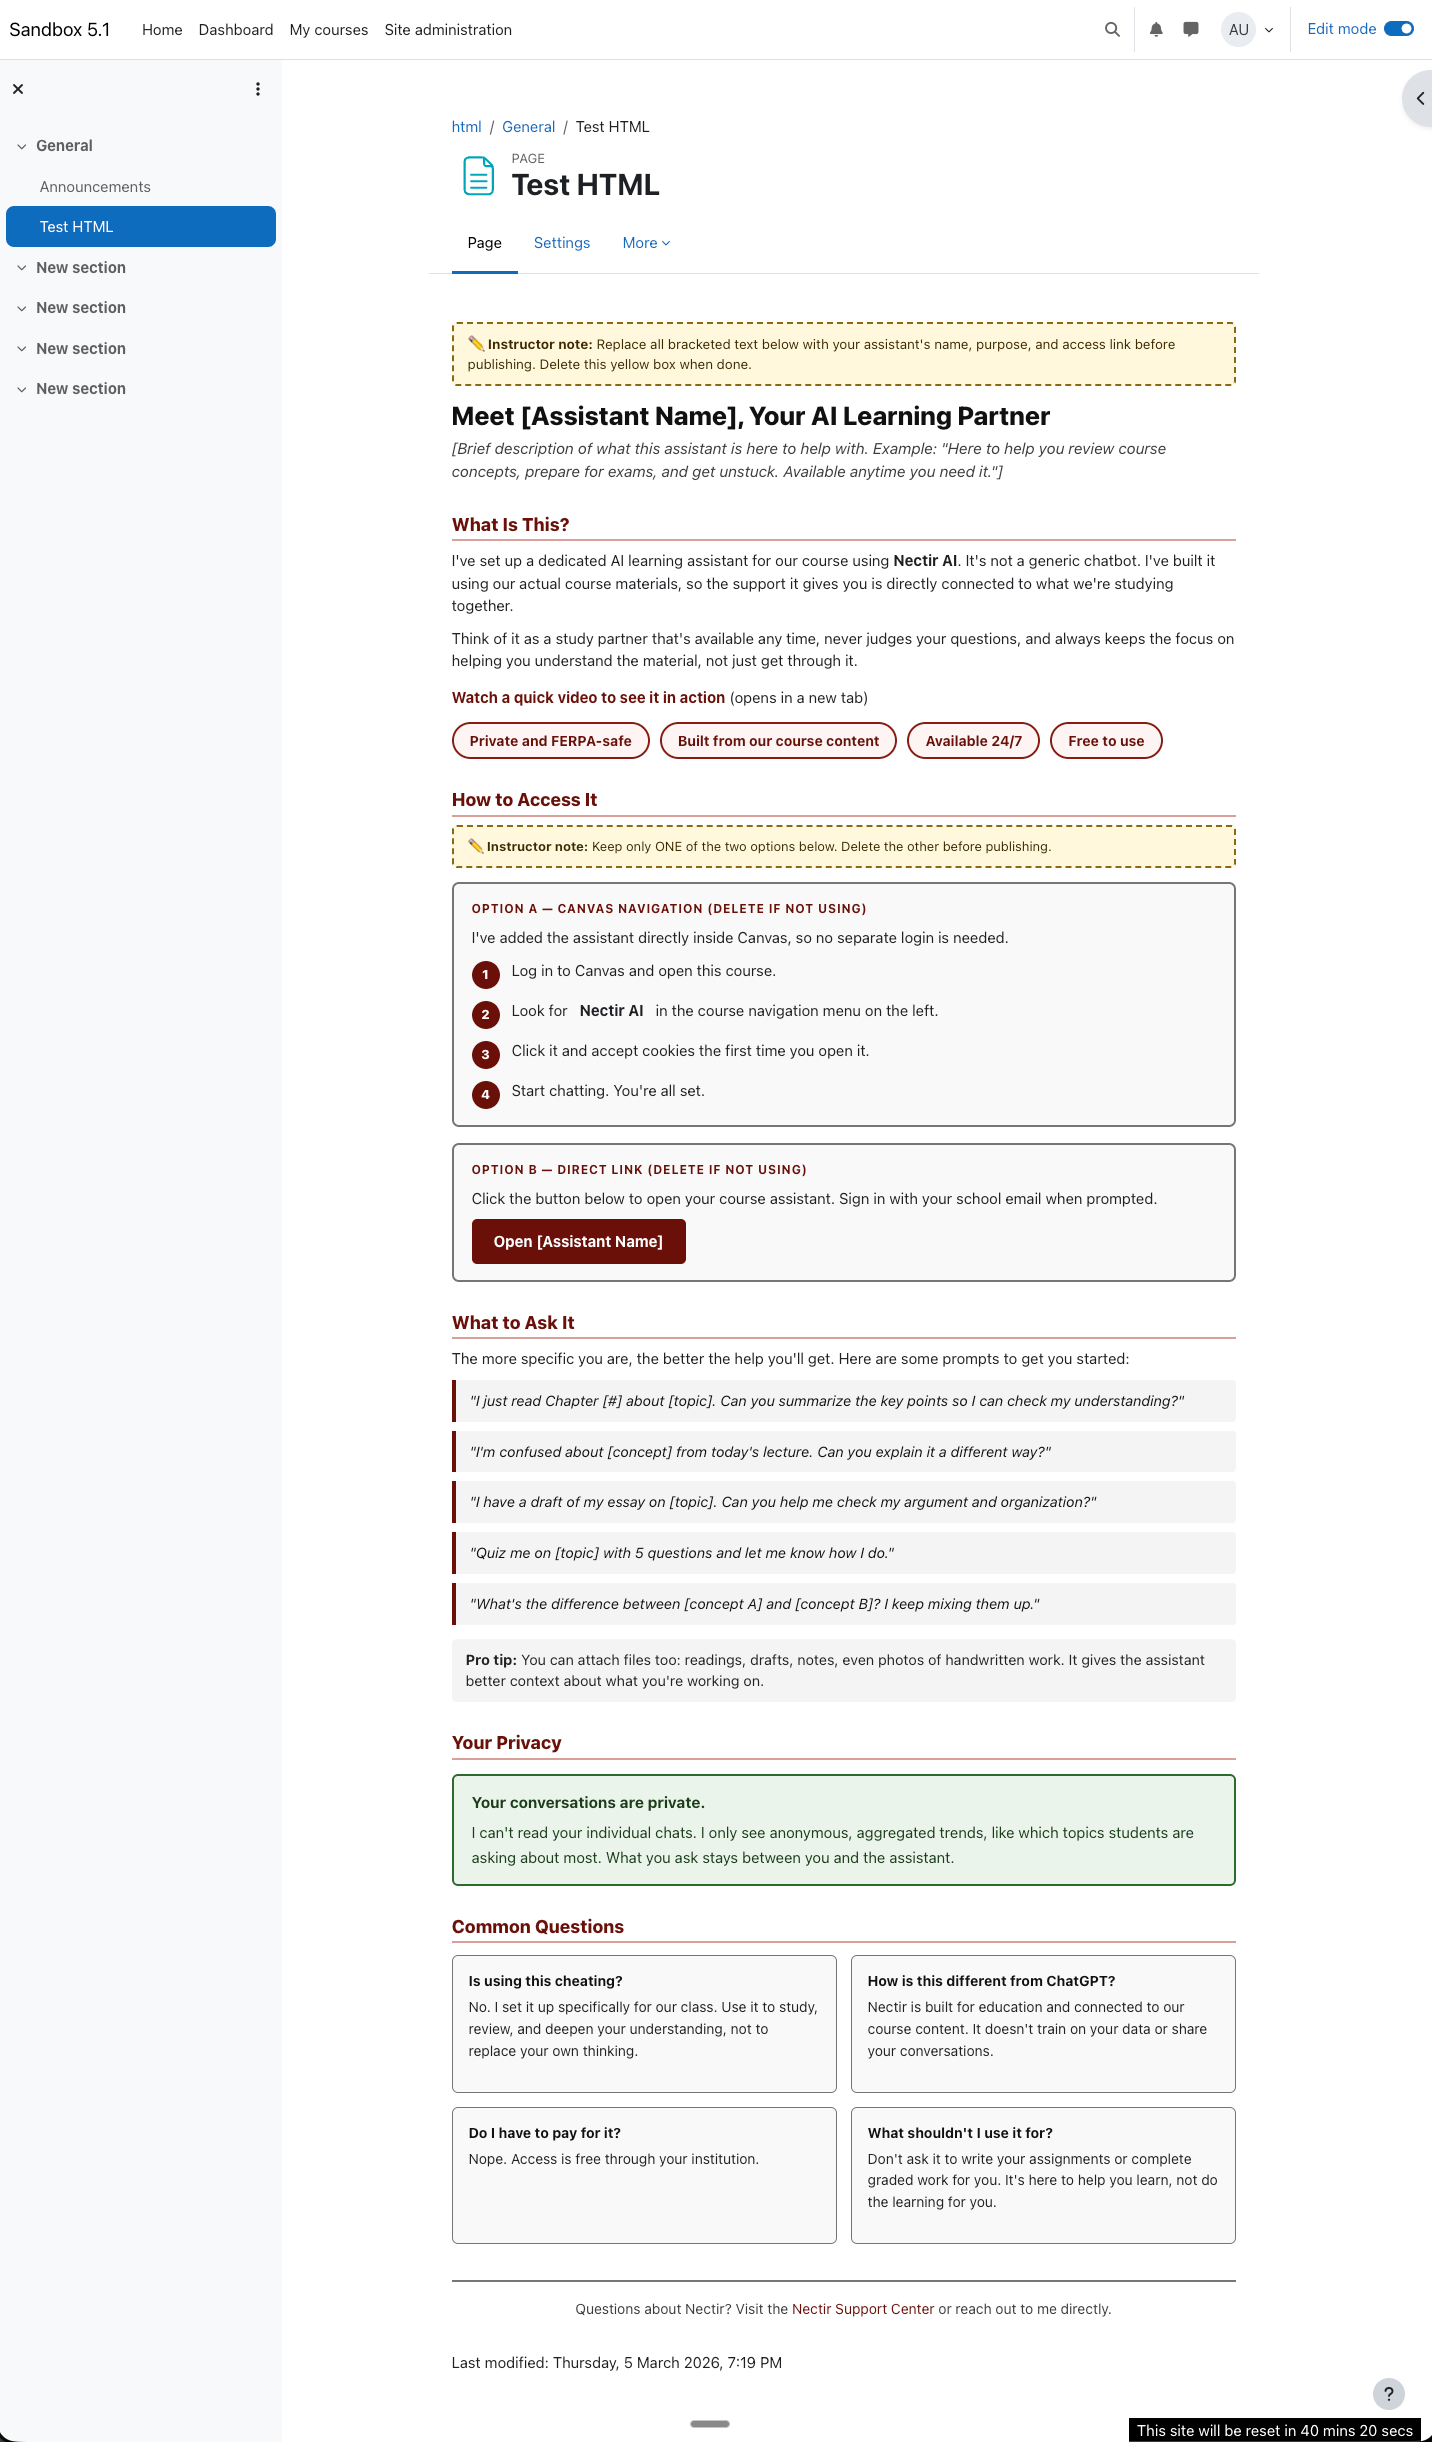
The page introduces students to their AI Assistant with access instructions, example prompts, and FAQs. Here's a preview of the customizable, student-facing page you'll be adding to your course:

<AccordionGroup>
  <Accordion title="Canvas">
    <Frame>
      <img src="https://mintcdn.com/nectir/AQcrqDLaWCyaOJAT/images/canvas-student-introduction-page.png?fit=max&auto=format&n=AQcrqDLaWCyaOJAT&q=85&s=5196bfd3afc0e6fbb5bd7bf89910d2cd" alt="Preview of the Canvas student introduction page showing the AI learning partner template with sections for access, example prompts, privacy, and FAQs" width="984" height="833" data-path="images/canvas-student-introduction-page.png" />
    </Frame>
  </Accordion>

  <Accordion title="Moodle">
    <Frame>
      <img src="https://mintcdn.com/nectir/PYmhxpwEmEoHVAeC/images/moodle-student-introduction-page.png?fit=max&auto=format&n=PYmhxpwEmEoHVAeC&q=85&s=95fbc4b6bdf84077bb51d2e90af68341" alt="Preview of the Moodle student introduction page showing the AI learning partner template with sections for access, example prompts, privacy, and FAQs" width="1432" height="2442" data-path="images/moodle-student-introduction-page.png" />
    </Frame>
  </Accordion>
</AccordionGroup>

## Add the Page to Your Course

The same HTML template works in both Canvas and Moodle. Choose your LMS below for setup instructions.

<AccordionGroup>
  <Accordion title="Canvas">
    There are two ways to add the page in Canvas: paste the HTML directly or import a pre-built course file.

    <Tabs>
      <Tab title="Copy the HTML">
        Use Canvas's built-in HTML editor to paste the template directly into a new page in your course. Before publishing, personalize the highlighted sections: your Assistant's name, how students access it, and any course-specific context.

        <Steps>
          <Step title="Copy the HTML Code">
            Expand the code block below and copy the entire HTML template.

            <Accordion title="View HTML Template">
              ```html theme={null}
              <!DOCTYPE html>
              <html lang="en">
              <head>
              <meta charset="UTF-8">
              <meta name="viewport" content="width=device-width, initial-scale=1.0">
              <title>Meet Your AI Learning Partner</title>
              </head>
              <body style="font-family: Arial, sans-serif; font-size: 16px; color: #222222; background: #ffffff; max-width: 820px; margin: 0 auto; padding: 24px 20px 48px; line-height: 1.7;">

                <main id="main-content">

                  <!-- INSTRUCTOR NOTE -->
                  <div role="note" style="background: #FFF8DC; border: 2px dashed #8B6914; border-radius: 5px; padding: 10px 14px; margin-bottom: 14px; font-size: 13.5px; color: #3D2B00;">
                    <strong>✏️ Instructor note:</strong> Replace all bracketed text below with your assistant's name, purpose, and access link before publishing. Delete this yellow box when done.
                  </div>

                  <!-- PAGE HEADER -->
                  <header style="margin-bottom: 28px;">
                    <h1 style="font-size: 26px; font-weight: 800; color: #111111; margin-bottom: 6px; margin-top: 0;">Meet [Assistant Name], Your AI Learning Partner</h1>
                    <p style="font-size: 15.5px; color: #3D3D3D; font-style: italic; margin: 0;">[Brief description of what this assistant is here to help with. Example: "Here to help you review course concepts, prepare for exams, and get unstuck. Available anytime you need it."]</p>
                  </header>

                  <!-- WHAT IS THIS -->
                  <section aria-labelledby="what-heading">
                    <h2 id="what-heading" style="font-size: 18px; font-weight: 800; color: #6B1008; margin: 30px 0 8px; padding-bottom: 4px; border-bottom: 2px solid #D9A09A;">What Is This?</h2>
                    <p style="margin-bottom: 10px;">I've set up a dedicated AI learning assistant for our course using <strong>Nectir AI</strong>. It's not a generic chatbot. I've built it using our actual course materials, so the support it gives you is directly connected to what we're studying together.</p>
                    <p style="margin-bottom: 14px;">Think of it as a study partner that's available any time, never judges your questions, and always keeps the focus on helping you understand the material, not just get through it.</p>

                    <!-- VIDEO LINK -->
                    <p style="margin-bottom: 14px;"><a href="https://support.nectir.io/interacting/using-your-assistant" target="_blank" rel="noopener noreferrer" style="color: #6B1008; font-weight: 700;">Watch a quick video to see it in action</a> (opens in a new tab)</p>

                    <!-- PILLS -->
                    <ul role="list" aria-label="Key features" style="list-style: none; display: flex; flex-wrap: wrap; gap: 10px; margin: 0 0 20px; padding: 0;">
                      <li style="background: #FDF4F3; border: 2px solid #8B1A10; border-radius: 20px; padding: 6px 16px; font-size: 14px; font-weight: 700; color: #6B1008;">Private and FERPA-safe</li>
                      <li style="background: #FDF4F3; border: 2px solid #8B1A10; border-radius: 20px; padding: 6px 16px; font-size: 14px; font-weight: 700; color: #6B1008;">Built from our course content</li>
                      <li style="background: #FDF4F3; border: 2px solid #8B1A10; border-radius: 20px; padding: 6px 16px; font-size: 14px; font-weight: 700; color: #6B1008;">Available 24/7</li>
                      <li style="background: #FDF4F3; border: 2px solid #8B1A10; border-radius: 20px; padding: 6px 16px; font-size: 14px; font-weight: 700; color: #6B1008;">Free to use</li>
                    </ul>
                  </section>

                  <!-- HOW TO ACCESS -->
                  <section aria-labelledby="access-heading">
                    <h2 id="access-heading" style="font-size: 18px; font-weight: 800; color: #6B1008; margin: 30px 0 8px; padding-bottom: 4px; border-bottom: 2px solid #D9A09A;">How to Access It</h2>

                    <div role="note" style="background: #FFF8DC; border: 2px dashed #8B6914; border-radius: 5px; padding: 10px 14px; margin-bottom: 14px; font-size: 13px; color: #3D2B00;">
                      <strong>✏️ Instructor note:</strong> Keep only ONE of the two options below. Delete the other before publishing.
                    </div>

                    <!-- Option A -->
                    <div style="border: 2px solid #767676; border-radius: 7px; padding: 16px 18px; background: #F9F9F9; margin-bottom: 16px;">
                      <span style="display: block; font-size: 12px; font-weight: 700; text-transform: uppercase; letter-spacing: .07em; color: #6B1008; margin-bottom: 8px;">Option A — Canvas Navigation (delete if not using)</span>
                      <p style="font-size: 15px; margin-bottom: 10px;">I've added the assistant directly inside Canvas, so no separate login is needed.</p>
                      <ol aria-label="Steps to access via Canvas" style="list-style: none; padding: 0; margin: 0;">
                        <li style="display: flex; align-items: flex-start; gap: 12px; margin-bottom: 10px; font-size: 15px;">
                          <span aria-hidden="true" style="min-width: 28px; height: 28px; background: #6B1008; color: #ffffff; border-radius: 50%; font-weight: 800; font-size: 13px; display: flex; align-items: center; justify-content: center; flex-shrink: 0; margin-top: 2px;">1</span>
                          <span>Log in to Canvas and open this course.</span>
                        </li>
                        <li style="display: flex; align-items: flex-start; gap: 12px; margin-bottom: 10px; font-size: 15px;">
                          <span aria-hidden="true" style="min-width: 28px; height: 28px; background: #6B1008; color: #ffffff; border-radius: 50%; font-weight: 800; font-size: 13px; display: flex; align-items: center; justify-content: center; flex-shrink: 0; margin-top: 2px;">2</span>
                          <span>Look for <strong>Nectir AI</strong> in the course navigation menu on the left.</span>
                        </li>
                        <li style="display: flex; align-items: flex-start; gap: 12px; margin-bottom: 10px; font-size: 15px;">
                          <span aria-hidden="true" style="min-width: 28px; height: 28px; background: #6B1008; color: #ffffff; border-radius: 50%; font-weight: 800; font-size: 13px; display: flex; align-items: center; justify-content: center; flex-shrink: 0; margin-top: 2px;">3</span>
                          <span>Click it and accept cookies the first time you open it.</span>
                        </li>
                        <li style="display: flex; align-items: flex-start; gap: 12px; margin-bottom: 0; font-size: 15px;">
                          <span aria-hidden="true" style="min-width: 28px; height: 28px; background: #6B1008; color: #ffffff; border-radius: 50%; font-weight: 800; font-size: 13px; display: flex; align-items: center; justify-content: center; flex-shrink: 0; margin-top: 2px;">4</span>
                          <span>Start chatting. You're all set.</span>
                        </li>
                      </ol>
                    </div>

                    <!-- Option B -->
                    <div style="border: 2px solid #767676; border-radius: 7px; padding: 16px 18px; background: #F9F9F9;">
                      <span style="display: block; font-size: 12px; font-weight: 700; text-transform: uppercase; letter-spacing: .07em; color: #6B1008; margin-bottom: 8px;">Option B — Direct Link (delete if not using)</span>
                      <p style="font-size: 15px; margin-bottom: 10px;">Click the button below to open your course assistant. Sign in with your school email when prompted.</p>
                      <a href="[PASTE SHARE LINK HERE]" target="_blank" rel="noopener noreferrer" aria-label="Open [Assistant Name], opens in a new tab" style="display: inline-block; background: #6B1008; color: #ffffff; text-decoration: none; padding: 11px 22px; border-radius: 5px; font-size: 15px; font-weight: 700;">Open [Assistant Name]</a>
                    </div>
                  </section>

                  <!-- WHAT TO ASK -->
                  <section aria-labelledby="prompts-heading">
                    <h2 id="prompts-heading" style="font-size: 18px; font-weight: 800; color: #6B1008; margin: 30px 0 8px; padding-bottom: 4px; border-bottom: 2px solid #D9A09A;">What to Ask It</h2>
                    <p style="margin-bottom: 10px;">The more specific you are, the better the help you'll get. Here are some prompts to get you started:</p>

                    <ul role="list" aria-label="Example prompts" style="list-style: none; padding: 0; margin: 10px 0 14px;">
                      <li style="background: #F4F4F4; border-left: 4px solid #6B1008; border-radius: 0 4px 4px 0; padding: 10px 14px; margin-bottom: 9px; font-size: 14.5px; color: #111111; font-style: italic;">"I just read Chapter [#] about [topic]. Can you summarize the key points so I can check my understanding?"</li>
                      <li style="background: #F4F4F4; border-left: 4px solid #6B1008; border-radius: 0 4px 4px 0; padding: 10px 14px; margin-bottom: 9px; font-size: 14.5px; color: #111111; font-style: italic;">"I'm confused about [concept] from today's lecture. Can you explain it a different way?"</li>
                      <li style="background: #F4F4F4; border-left: 4px solid #6B1008; border-radius: 0 4px 4px 0; padding: 10px 14px; margin-bottom: 9px; font-size: 14.5px; color: #111111; font-style: italic;">"I have a draft of my essay on [topic]. Can you help me check my argument and organization?"</li>
                      <li style="background: #F4F4F4; border-left: 4px solid #6B1008; border-radius: 0 4px 4px 0; padding: 10px 14px; margin-bottom: 9px; font-size: 14.5px; color: #111111; font-style: italic;">"Quiz me on [topic] with 5 questions and let me know how I do."</li>
                      <li style="background: #F4F4F4; border-left: 4px solid #6B1008; border-radius: 0 4px 4px 0; padding: 10px 14px; margin-bottom: 0; font-size: 14.5px; color: #111111; font-style: italic;">"What's the difference between [concept A] and [concept B]? I keep mixing them up."</li>
                    </ul>

                    <p style="font-size: 14.5px; color: #222222; background: #F4F4F4; border-radius: 5px; padding: 10px 14px; margin-top: 4px;"><strong>Pro tip:</strong> You can attach files too: readings, drafts, notes, even photos of handwritten work. It gives the assistant better context about what you're working on.</p>
                  </section>

                  <!-- PRIVACY -->
                  <section aria-labelledby="privacy-heading">
                    <h2 id="privacy-heading" style="font-size: 18px; font-weight: 800; color: #6B1008; margin: 30px 0 8px; padding-bottom: 4px; border-bottom: 2px solid #D9A09A;">Your Privacy</h2>
                    <div role="region" aria-label="Privacy information" style="background: #EAF4EA; border: 2px solid #2D6B2D; border-radius: 6px; padding: 14px 18px; margin: 14px 0 20px; font-size: 15px; color: #1A3D1A; line-height: 1.65;">
                      <strong style="display: block; margin-bottom: 5px; font-size: 15.5px;">Your conversations are private.</strong>
                      I can't read your individual chats. I only see anonymous, aggregated trends, like which topics students are asking about most. What you ask stays between you and the assistant.
                    </div>
                  </section>

                  <!-- FAQ -->
                  <section aria-labelledby="faq-heading">
                    <h2 id="faq-heading" style="font-size: 18px; font-weight: 800; color: #6B1008; margin: 30px 0 8px; padding-bottom: 4px; border-bottom: 2px solid #D9A09A;">Common Questions</h2>
                    <div style="display: grid; grid-template-columns: 1fr 1fr; gap: 14px; margin: 12px 0 24px;">

                      <div style="background: #F9F9F9; border: 1px solid #767676; border-radius: 6px; padding: 14px 16px;">
                        <dl>
                          <dt style="font-weight: 700; font-size: 14px; color: #111111; margin-bottom: 5px;">Is using this cheating?</dt>
                          <dd style="font-size: 14px; color: #222222; line-height: 1.55; margin: 0;">No. I set it up specifically for our class. Use it to study, review, and deepen your understanding, not to replace your own thinking.</dd>
                        </dl>
                      </div>

                      <div style="background: #F9F9F9; border: 1px solid #767676; border-radius: 6px; padding: 14px 16px;">
                        <dl>
                          <dt style="font-weight: 700; font-size: 14px; color: #111111; margin-bottom: 5px;">How is this different from ChatGPT?</dt>
                          <dd style="font-size: 14px; color: #222222; line-height: 1.55; margin: 0;">Nectir is built for education and connected to our course content. It doesn't train on your data or share your conversations.</dd>
                        </dl>
                      </div>

                      <div style="background: #F9F9F9; border: 1px solid #767676; border-radius: 6px; padding: 14px 16px;">
                        <dl>
                          <dt style="font-weight: 700; font-size: 14px; color: #111111; margin-bottom: 5px;">Do I have to pay for it?</dt>
                          <dd style="font-size: 14px; color: #222222; line-height: 1.55; margin: 0;">Nope. Access is free through your institution.</dd>
                        </dl>
                      </div>

                      <div style="background: #F9F9F9; border: 1px solid #767676; border-radius: 6px; padding: 14px 16px;">
                        <dl>
                          <dt style="font-weight: 700; font-size: 14px; color: #111111; margin-bottom: 5px;">What shouldn't I use it for?</dt>
                          <dd style="font-size: 14px; color: #222222; line-height: 1.55; margin: 0;">Don't ask it to write your assignments or complete graded work for you. It's here to help you learn, not do the learning for you.</dd>
                        </dl>
                      </div>

                    </div>
                  </section>

                </main>

                <footer style="margin-top: 36px; padding-top: 16px; border-top: 2px solid #767676; font-size: 14px; color: #3D3D3D; text-align: center;">
                  <p>Questions about Nectir? Visit the <a href="https://support.nectir.io" target="_blank" rel="noopener noreferrer" style="color: #6B1008;">Nectir Support Center</a> or reach out to me directly.</p>
                </footer>

              </body>
              </html>
              ```
            </Accordion>
          </Step>

          <Step title="Create a New Canvas Page">
            In your Canvas course, go to **Pages** and click **+ Page**. Switch to the HTML editor view.
          </Step>

          <Step title="Paste and Customize">
            Paste the HTML code and update the bracketed sections with your Assistant's name, access instructions, and any course-specific details. Delete the yellow instructor notes when done.
          </Step>

          <Step title="Publish">
            Save and publish the page. Consider pinning it to your course homepage for visibility.
          </Step>
        </Steps>
      </Tab>

      <Tab title="Import Course File">
        Prefer a one-click import? Download the `.imscc` file and import it into your Canvas course. It will create a pre-built page ready for you to customize.

        <Card title="Download .imscc File" icon="download" href="https://drive.google.com/file/d/1NHuFu-JjV3RMsscpv4yrreMiAlp5Srpp/view?usp=sharing">
          Import this file into Canvas to create a pre-built student introduction page
        </Card>

        <Steps>
          <Step title="Download the File">
            Click the link above to download the `.imscc` course file.
          </Step>

          <Step title="Import into Canvas">
            In your Canvas course, go to **Settings** → **Import Course Content**. Select **Canvas Course Export Package** and upload the file.
          </Step>

          <Step title="Customize">
            Once imported, navigate to **Pages** and edit the new page. Update your Assistant's name, access method, and any course-specific details.
          </Step>
        </Steps>
      </Tab>
    </Tabs>
  </Accordion>

  <Accordion title="Moodle">
    The same HTML template works in Moodle. Use the source code editor to paste it into a course page.

    <Steps>
      <Step title="Copy the HTML Code">
        Expand the **Canvas** accordion above, open the **Copy the HTML** tab, and copy the entire HTML template from the code block.
      </Step>

      <Step title="Create a New Moodle Page">
        In your Moodle course, turn on **Edit mode** (top right corner). Inside a course section, click **+ Add an activity or resource** and choose **Page**.
      </Step>

      <Step title="Paste the HTML">
        In the **Content** field, click **Tools** → **Source code**. Paste the HTML template into the source code editor and click **Save**.
      </Step>

      <Step title="Customize and Save">
        Update the bracketed sections with your Assistant's name, access instructions, and course-specific details. Delete the yellow instructor notes, then save the page.
      </Step>
    </Steps>
  </Accordion>
</AccordionGroup>

## Tips for Introducing Nectir Well

<Tip>
  **Set the tone on Day 1.** A brief, genuine introduction from you matters more than any page. Students take their cues from you. Let them know Nectir is a learning partner, not a shortcut, and that it's built specifically for your class.
</Tip>

A framing that works well:

> *"Nectir is part of how this course works. It's here to help you study, practice, and build understanding, not to replace your work or write for you."*

<Tip>
  **Put it somewhere they'll actually see it.** Pin the page to your course homepage, link it in your syllabus, or share it in a Week 1 announcement. Students who find Nectir early use it more.
</Tip>

<Tip>
  **Remind them at key moments.** Students forget tools exist. A quick mention during Week 4–5, midterms, and finals makes a real difference in usage.
</Tip>

### Announcement Rhythm

| Timing       | Message Focus                                 |
| ------------ | --------------------------------------------- |
| Week 1       | Introduce the Assistant and how to access it  |
| Week 4–5     | Connect it to a current topic or assignment   |
| Midterm Week | Encourage study support and practice problems |
| Finals Week  | End-of-term encouragement and review          |

## Ice Breaker Activity

Give students a low-stakes first interaction to build comfort with their Assistant. This works as a 5-minute in-class activity or an asynchronous assignment during Week 1.

<Steps>
  <Step title="Prompt Students to Try It">
    Ask students to open their AI Assistant and try one of these prompts:

    * *"I'm confused about \[topic from class]. Can you explain it a different way?"*
    * *"I'm working on \[assignment information]. Can you help me think through my approach?"*
    * *"Here's my explanation of \[concept]. Can you tell me if I've got it right?"*
  </Step>

  <Step title="Debrief Briefly">
    After the activity, ask a few students to share what they learned or what surprised them. This normalizes using the tool and shows it's part of the learning process.
  </Step>
</Steps>

<Note>
  You don't need to grade this. The goal is simply to get students past their first interaction so they're comfortable returning on their own.
</Note>

## Syllabus Language

Copy and paste this paragraph into your syllabus. Update the bracketed sections to match your course.

```text theme={null}
This course uses Nectir AI, an AI-powered learning assistant built specifically
for [Course Name]. Nectir is available to help you study, review course material,
practice with sample problems, and deepen your understanding of key concepts.
It is not a substitute for completing your own work. To access Nectir, [describe
access method — e.g., "click the Nectir link in our LMS course" or "visit
nectir.io and log in with your school email"]. Your conversations with the
assistant are private and are not shared with your instructor. If you have
questions about appropriate use, please ask.
```

<Tip>
  Pairing this with a brief verbal introduction on Day 1 makes a big difference. Students are more likely to use the tool when they hear directly from you that it's encouraged.
</Tip>

## Common Student Questions

Have these answers ready for the questions students ask most.

<AccordionGroup>
  <Accordion title="Is using Nectir cheating?">
    No. It's a tool created for your class to help you study, review, and learn more effectively. Your instructor chose to include it as a learning resource.
  </Accordion>

  <Accordion title="Will my instructor see my chats?">
    No. Student conversations are private. Your instructor sees only general usage data, not individual conversations.
  </Accordion>

  <Accordion title="How is Nectir different from ChatGPT?">
    Nectir is built for education. It's connected to your course content and doesn't share or train on student data. It's designed to help you learn, not just give you answers.
  </Accordion>

  <Accordion title="Do I have to pay for it?">
    No. Access is free through your institution.
  </Accordion>

  <Accordion title="What shouldn't I use it for?">
    Don't ask Nectir to complete graded work or bypass assignments. It's meant to enhance your learning, not replace it. When in doubt, ask your instructor.
  </Accordion>
</AccordionGroup>

## Faculty Guide

The AI Faculty Guide walks you through setup, student introductions, and strategies for keeping engagement strong all term long.

<Card title="View the AI Faculty Guide" icon="book-open" href="https://www.canva.com/design/DAG3v7_ymbw/HZ9tQYbkLgC1aJ-9pDx4_A/view?utm_content=DAG3v7_ymbw&utm_campaign=designshare&utm_medium=link2&utm_source=uniquelinks&utlId=h717aaf08de">
  Comprehensive guide covering setup, introductions, and engagement strategies
</Card>

## Related Resources

<CardGroup cols={2}>
  <Card title="Student Quick Start Guide" icon="user" href="/interacting/using-your-assistant">
    Share this page directly with students to help them get started
  </Card>

  <Card title="Onboard Faculty and Staff to Nectir AI" icon="chalkboard-user" href="/resources/onboard-faculty-and-staff">
    The educator-facing companion: a Canvas module that introduces Nectir to faculty and staff
  </Card>

  <Card title="Create & Manage Groups" icon="users" href="/creating/group-settings">
    Set up course Groups and manage student access
  </Card>

  <Card title="LMS Integrations" icon="link" href="/lms-integrations/canvas-lti-guided">
    Connect your LMS to Nectir AI
  </Card>

  <Card title="Roster Sync & Invitations" icon="arrows-rotate" href="/user-management/roster-sync">
    Automatically sync students from your LMS
  </Card>
</CardGroup>
